语言切换: English | 简体中文
Koa + TypeScript + IOC = Koatty. Koatty 是一个渐进式 Node.js 框架,用于构建高效、可扩展的服务端应用程序。非常适合使用 TypeScript 构建企业级 API、微服务和全栈应用。


- 🚄 高性能: 基于 Koa 构建,优化的架构设计
- 🧩 功能完善: 支持 gRPC、HTTP、WebSocket、GraphQL、定时任务等
- 🧠 TypeScript 优先: 原生 TypeScript 支持,优雅的面向对象设计
- 🌀 类 Spring IOC 容器: 强大的依赖注入系统,支持自动装配
- ✂️ AOP 支持: 面向切面编程,基于装饰器的拦截器
- 🔌 可扩展架构: 插件系统,支持依赖注入
- 📦 现代化工具: CLI 脚手架、测试工具和生产就绪配置
- 🌐 协议无关: 一次编写,可部署为 HTTP/gRPC/WebSocket/GraphQL 服务
- ✅ 多协议架构 - 同时运行 HTTP、HTTPS、HTTP/2、HTTP/3、gRPC、WebSocket、GraphQL,每个协议独立服务器实例
- ✅ 智能元数据缓存 - LRU 缓存和预加载,性能提升 70%+,元数据操作 < 0.01ms/次
- ✅ 应用生命周期钩子 - 使用
@OnEvent装饰器API,支持 appBoot/appReady/appStart/appStop 等生命周期事件 - ✅ 版本冲突检测 - 自动检测和解决依赖冲突
- ✅ 配置文件重构 - 服务器配置独立到
server.ts,路由扩展配置采用协议名作为键的新格式 - ✅ Component 装饰器增强 - 支持
priority、scope、requires、version、description等配置项
- ✅ 路由中间件管理器 - 路由级别中间件隔离,支持优先级配置和条件执行
- ✅ 协议特定中间件 - 使用
@Middleware({ protocol: [...] })绑定中间件到特定协议 - ✅ 中间件元数据传递 - 通过
withMiddleware()传递配置参数,支持动态启用/禁用 - ✅ 路由器工厂模式 - 灵活的路由器创建和管理,支持自定义路由器注册
- ✅ 增强的 gRPC 支持
- 支持四种 gRPC 流类型(服务器流、客户端流、双向流、单向流)
- 自动流类型检测和背压控制
- 连接池管理和批处理支持
- 超时检测和重复调用保护
- ✅ GraphQL over HTTP/2 - SSL 配置自动 HTTP/2 升级,支持多路复用和压缩,自动 HTTP/1.1 回退
- ✅ WebSocket 增强 - 心跳检测、连接数限制、帧大小控制
- ✅ 优雅关闭增强 - 五步式优雅关闭流程,增强的连接池管理和清理处理程序
- 停止接收新请求
- 等待处理中的请求完成
- 触发 stop 事件
- 清理 WebSocket 连接、gRPC 流等资源
- 正常退出进程
- ✅ OpenTelemetry 链路追踪 - 全栈可观测性,支持分布式链路追踪
- ✅ 多协议指标收集 - 自动收集 HTTP、WebSocket、gRPC 指标并导出到 Prometheus
- 请求总数(requests_total)
- 错误总数(errors_total)
- 响应时间(response_time_seconds)
- ✅ 健康检查 - 多层次健康状态监控
- ✅ 全局异常处理 -
@ExceptionHandler()装饰器集中错误管理,支持多协议异常处理 - ✅ 链式异常调用 - 支持方法链式调用,代码更优雅
- ✅ 自定义异常处理器 - 支持自定义错误响应格式和日志格式
- ✅ 高性能连接池 - 每种协议优化的连接池实现,智能监控和自动清理
- ✅ 配置热重载 - 智能检测配置变更,自动决定重启策略
- ✅ 性能提升 - HTTP 上下文创建 < 0.1ms,GraphQL 上下文创建 < 0.2ms,并发处理 > 10,000 ops/sec
- 💪 Swagger/OpenAPI 3.0 - 自动生成 API 文档
- ✅ 完整 TypeScript 支持 - 完整的类型定义和类型安全
- ✅ Koa 3.0 升级 - 升级到 Koa 3.0,性能和兼容性提升
- ✅ 装饰器模式 - 统一的装饰器 API,更简洁的代码风格
npm i -g koatty_cli命令行工具的版本同Koatty框架的版本是对应的,例如 koatty_cli@1.11.x 支持 koatty@1.11.x版本的新特性。
kt new projectName

cd ./projectName

yarn install
// dev模式
npm run dev

// pro模式
npm start
浏览器中访问 http://localhost:3000/.
墙裂推荐使用Visual Studio Code(简称 VScode)进行开发, 编辑项目目录下的 .vscode/launch.json文件(点击调试-配置也可以打开):
{
    "version": "0.2.0",
    "configurations": [
        {
            "type": "node",
            "request": "launch",
            "name": "TS Program",
            "args": [
                "${workspaceRoot}/src/App.ts"
            ],
            "runtimeArgs": [
                "--nolazy",
                "-r",
                "ts-node/register"
            ],
            "sourceMaps": true,
            "cwd": "${workspaceRoot}",
            "protocol": "inspector",
            "internalConsoleOptions": "neverOpen"
        }
    ]
}
选择 TS Program 以debug模式启动, 访问 http://127.0.0.1:3000
koatty目前仅支持jest测试框架编写测试用例
import request from 'supertest';
import { ExecBootStrap } from 'koatty';

import { App } from '../src/App';

describe('UT example', () => {

  let server;
  beforeAll(async () => {
    const appInstance = await ExecBootStrap()(App);
    server = appInstance.callback();
  });

  it('request', async (done) => {
    const rsp = await request(server).get('/path/to/server');
    expect(rsp.status).toBe(200);
    done();
  });
});Koatty的命令行工具koatty_cli在创建项目的时候,默认会形成以下目录结构:
<projectName>
├── .vscode                       # vscode配置
│   └── launch.json               # node本地调试脚本
├── dist                          # 编译后目录
├── src                           # 项目源代码
│   ├── config
│   │   ├── config.ts             # 框架通用配置
│   │   ├── server.ts             # 服务器配置(协议、端口、SSL等)
│   │   ├── db.ts                 # 存储配置
│   │   ├── middleware.ts         # 中间件配置
│   │   ├── plugin.ts             # 插件配置
│   │   └── router.ts             # 路由配置
│   ├── aspect                    # AOP切面类
│   │   └── TestAspect.ts
│   ├── controller                # 控制器
│   │   └── TestController.ts
│   ├── middleware                # 中间件
│   │   ├── JwtMiddleware.ts
│   │   └── ViewMiddleware.ts
│   ├── model                     # 持久层
│   │   └── TestModel.ts
│   ├── plugin                    # 插件
│   │   └── TestPlugin.ts
│   ├── service                   # service逻辑层
│   │   └── TestService.ts
│   ├── utils                     # 工具函数
│   │   └── tool.ts
│   └── App.ts                    # 入口文件
├── resource                      # 用于存放静态数据或白名单等
│   └── proto                     # pb协议
│   │     └── test.proto
│   └── graphql                   # graphql协议
│   │     └── User.graphql
│   └── data.json
├── static                        # 静态文件目录
│   └── index.html
├── test                          # 测试用例
│   └── index.test.js
├── apidoc.json
├── pm2.json
├── package.json
├── README.md
└── tsconfig.json
但是Koatty支持灵活的自定义项目结构,除配置目录(通过@ConfiguationScan()定制)以及静态资源目录(需要修改Static中间件默认配置)以外,其他目录名称、结构等都可以自行定制。
Koatty默认的入口文件是 App.ts,内容如下:
import { Koatty, Bootstrap } from "koatty";
// import * as path from "path";

@Bootstrap(
    //bootstrap function
    // (app: any) => {
    //调整libuv线程池大小
    // process.env.UV_THREADPOOL_SIZE = "128";
    //忽略https自签名验证
    // process.env.NODE_TLS_REJECT_UNAUTHORIZED = '0';
    // }
)
// @ComponentScan('./')
// @ConfiguationScan('./config')
export class App extends Koatty {
    public init() {
        // this.appDebug = true; //线上环境请将debug模式关闭,即:appDebug:false
    }
}
App类继承于Koatty类,而Koatty是对于Koa的继承和扩展。因此可以认为App类的实例就是koa类的实例(进行了扩展) app对象。
Koatty通过@Bootstrap()装饰器来定义项目入口。@Bootstrap()可以接受函数作为参数,该函数在项目加载时初始化环境参数后执行。
Koatty通过@ComponentScan()装饰器来定义项目目录。如果修改了项目目录, 需要传入项目相对目录名;如果想排除某些目录Bean不自动进行加载,可以将不自动加载的文件放在项目目录之外。
Koatty通过@ConfiguationScan()装饰器用于定制项目配置文件目录。默认值./config,即项目目录下的config子目录。
App 是全局应用对象,在一个应用中,只会实例化一个,它继承自 Koa.Application,在它上面我们可以挂载一些全局的方法和对象。我们可以轻松的在插件或者应用中扩展 App 对象。
在CONTROLLER,SERVICE,COMPONENT类型bean中默认已经注入了App对象,可以直接进行使用:
@Controller()
export class TestController {
    ...

    test() {
        //打印app对象
        console.log(this.app);
    }
}在MIDDLEWARE类型bean中,App对象作为函数入参传递:
@Middleware()
export class TestMiddleware {
    run(options: any, app: Koatty) {
        ...
        //打印app对象
        console.log(app);
    }
}
Ctx 是一个请求级别的对象,继承自 Koa.Context。在每一次收到用户请求时,框架会实例化一个 Ctx 对象,这个对象封装了这次用户请求的信息,并提供了许多便捷的方法来获取请求参数或者设置响应信息。
在 CONTROLLER类型bean中,Ctx对象作为成员属性。可以直接使用:
@Controller()
export class TestController {
    ...

    test() {
        //打印ctx对象
        console.log(this.ctx);
    }
}在MIDDLEWARE类型bean中,Ctx对象作为中间件执行函数入参传递:
@Middleware()
export class TestMiddleware {
    run(options: any, app: Koatty) {
        ...

        return async function (ctx: any, next: any) {

            //打印ctx对象
            console.log(ctx);

            return next();
        };
    }
}在SERVICE,COMPONENT类型bean中,Ctx对象需要自行传递:
@Service()
export class RequestService {
    app: App;

    Test(ctx: KoattyContext){
        //打印ctx对象
        console.log(ctx);
    }
}
注意 app.context 和 context.app 的区别: app.context 是一个用于每次请求的上下文对象的原型。每次接收到请求时,Koa 会为该请求创建一个新的 context 对象,并将其赋给当前请求的 ctx 变量。尽管每个请求的 context 是基于 app.context 创建的,但这并不意味着 app.context 会被覆盖。app.context 实际上是一个模板,用于生成新的上下文实例。 context 中包含对 app 的引用, 尽管持有对 app 的引用,但它和 app 之间的关系是单向的(context 通过属性访问 app,而不反过来)
实际项目中,肯定需要各种配置,包括:框架需要的配置以及项目自定义的配置。Koatty 将所有的配置都统一管理,并根据不同的功能划分为不同的配置文件。
- config.ts 通用的一些配置(日志级别、日志路径、敏感字段等)
- server.ts 服务器配置(协议、端口、SSL、链路追踪等)
- db.ts 数据库配置
- router.ts 路由配置(路由前缀、载荷解析、协议特定扩展配置)
- middleware.ts 中间件配置
- plugin.ts 插件配置
注意: 从 Koatty 4.0 开始,服务器相关配置(hostname、port、protocol、ssl等)已从
config.ts独立到server.ts文件中,以便更清晰地管理服务器配置。
除上述常见的配置文件之外,Koatty也支持用户自行定义的配置文件命名。
Koatty 从 4.0 版本开始,服务器配置已独立到 config/server.ts 文件中。支持同时运行多个协议。
// config/server.ts
export default {
  hostname: '127.0.0.1', // 服务器主机名
  port: 3000,            // 服务器端口(单端口或数组)
  protocol: "http",      // 单协议模式
  trace: false,          // 是否启用链路追踪
  ssl: {
    mode: 'auto',        // 'auto' | 'manual' | 'mutual_tls'
    key: '',             // SSL 密钥文件路径
    cert: '',            // SSL 证书文件路径
    ca: ''               // CA 证书文件路径
  }
}

// 多协议模式
export default {
  hostname: '127.0.0.1',
  // 端口配置:单值或数组
  // 如果是数组,每个端口对应相应的协议
  // 如果是单值,第一个协议使用它,其他协议自动递增 (3000, 3001, 3002...)
  port: [3000, 50051],
  protocol: ["http", "grpc"], // 多协议: 'http' | 'https' | 'http2' | 'grpc' | 'ws' | 'wss' | 'graphql'
  trace: false,
  ssl: {
    mode: 'auto',
    key: './ssl/server.key',
    cert: './ssl/server.crt'
  }
}工作原理:
koatty_serve为每个协议自动创建服务器实例koatty_router为每个协议创建专用路由器实例- 控制器根据装饰器自动注册到相应的路由器
- HTTP 控制器 (
@Controller) 适用于 HTTP/HTTPS/HTTP2 - gRPC 控制器 (
@GrpcController) 适用于 gRPC - GraphQL 控制器 (
@GraphQLController) 适用于 GraphQL(基于 HTTP/HTTPS) - WebSocket 控制器 (
@WsController) 适用于 WebSocket
重要说明:
-
GraphQL 协议: GraphQL 是运行在 HTTP/HTTP2 之上的应用层协议,而不是独立的传输协议。当指定
protocol: "graphql"时,Koatty 会自动:- 默认使用 HTTP 作为传输协议
- 配置 SSL 证书时使用 HTTP/2(推荐用于生产环境)
-
GraphQL over HTTP/2(推荐): HTTP/2 为 GraphQL 提供显著优势:
- 多路复用: 在单个连接上处理多个查询
- 头部压缩: 减少大查询的带宽
- 服务器推送: 预取相关资源
- HTTP/1.1 回退: 自动降级以保持兼容性
要为 GraphQL 启用 HTTP/2,在
config/server.ts中配置:// config/server.ts export default { hostname: '127.0.0.1', port: 3000, protocol: "graphql", trace: false, ssl: { mode: 'auto', key: './ssl/server.key', cert: './ssl/server.crt' } }
然后在
config/router.ts中配置 GraphQL schema(使用协议名作为键):// config/router.ts export default { ext: { graphql: { schemaFile: "./resource/graphql/schema.graphql", playground: true, // 启用 GraphQL Playground introspection: true, // 启用内省查询 depthLimit: 10, // 查询深度限制 // 可选: HTTP/2 相关配置 // http2: { maxConcurrentStreams: 100 } } } }
配置文件默认放在 src/config/ 目录下,我们还可以通过在入口文件App.ts类自定义配置扫描路径:
//App.ts

@ConfiguationScan('./myconfig')
export class App extends Koatty {

    public init() {
        ...
    }
}
Koatty启动时会自动扫描项目 src/myconfig目录下所有文件(.ts),按照文件名分类加载为配置
Koatty的配置文件必须是标准的ES6 Module格式进行导出,否则会无法加载。格式如下:
export default {
    ...
    aa: "bb",
    cc: {
      dd: ""
    }
    ...
}在项目中有两种方式可以很方便的读取配置:
- 方式一(使用app.config函数):
//
...
const conf: Test = this.app.config("test");- 方式二(利用装饰器进行注入,推荐用法)
@Controller()
export class AdminController {
    @Config("test")
    conf: Test;
}
上述读取配置代码中的配置类型'Test',是定义的配置类。当然也可以使用Object或者any类型
Koatty在启动扫描配置文件目录时,会按照文件名对配置进行分类。例如:db.ts加载完成后,读取该文件内的配置项需要增加类型
// config函数的第二个参数为配置类型
const conf: Test = this.app.config("test", "db");

或者

@Config("test", "db")
conf: Test;
配置默认分类是
config,因此 config.ts文件内的配置项无需填写类型参数
Koatty在读取配置时支持配置层级,例如配置文件db.ts:
export default {
    /*database config*/
    database: {
        db_type: 'mysql', //support  postgresql,mysql...
        db_host: '127.0.0.1',
        db_port: 3306,
        db_name: 'test',
        db_user: 'test',
        db_pwd: '',
        db_prefix: '',
        db_charset: 'utf8'
    }
}
读取 db_host的值:
@Config("database.db_host", "db")
dbHost: string;

或者

const dbHost: string = this.app.config("database.db_host", "db");需要特别注意的是,层级配置仅支持直接访问到二级,更深的层级请赋值给变量后再次获取:
//config
export default {
    test: {
        bb: {
            cc: 1
        }
    }
}

const conf: any = this.app.config("test");
const cc: number = conf.bb.cc;Koatty可以自动识别当前运行环境,并且根据运行环境自动加载相应配置(如果有相关配置)。
运行环境由三个属性来进行定义:
-
appDebug
在项目入口文件的构造方法(init)内进行定义
//App.ts
@Bootstrap()
export class App extends Koatty {
    public init() {
        //appDebug值为true时,development模式
        //appDebug值为false时,production模式
        this.appDebug = false;
    }
}-
process.env.NODE_ENV
Node.js的运行时环境变量,可以在系统环境定义,也可以在项目入口文件启动函数中定义
-
process.env.KOATTY_ENV
Koatty框架运行时环境变量
三者之间的关系和区别:
| 变量 | 取值 | 说明 | 优先级 |
|---|---|---|---|
| appDebug | true/false | 调试模式 | 高 |
| process.env.KOATTY_ENV | development/production | 框架运行时环境变量 | 中 |
| process.env.NODE_ENV | development/production | Node.js运行时环境变量 | 低 |
这里的优先级指加载运行时相应配置文件的优先级,优先级高的配置会覆盖优先级低的配置。
app.env = process.env.KOATTY_ENV || process.env.NODE_ENV;
if (app.appDebug) {
  app.env = 'development';
}
如果 app.env = production, koatty_config 会自动加载以 _pro.ts 或 _production.ts 后缀的配置文件。app.env = development, 则会自动加载以 _dev.ts 或 _development.ts 后缀的配置文件。
例如:
// 自动加载 config_dev.ts 或 config_development.ts
NODE_ENV=dev ts-node "test/test.ts"
通过对这三个变量的灵活配置,可以支持多样化的运行环境及配置
Koatty可以自动识别命令行参数,并且自动填充到相应的配置项:
// 自动填充config.cc.dd.ee的值
NODE_ENV=dev ts-node "test/test.ts" --config.cc.dd.ee=77
Koatty可以自动将配置文件中使用 ${} 占位符标识的配置项替换为process.env内的同名项的值:
config.ts
export default {
    ...
    ff: "${ff_value}"
    ...
}
// 自动填充ff_value的值
NODE_ENV=dev ff_value=999 ts-node "test/test.ts"
- process.env.ROOT_PATH
Koatty定义的项目根目录,在项目中任何地方均可使用。
- process.env.APP_PATH
Koatty定义的项目应用目录(调试模式下启动,值为/projectDIR/src;在生产模式下启动,值为/projectDIR/dist),在项目中任何地方均可使用。
- process.env.KOATTY_PATH
Koatty定义的框架根目录(/projectDIR/node_modules/koatty/),在项目中任何地方均可使用。
- process.env.LOGS_PATH
Koatty定义的日志保存目录(默认为/projectDIR/logs,可在配置中修改),在项目中任何地方均可使用。
Koatty 封装了一个专门处理路由的库 koatty_router,支持 HTTP1/2、WebSocket、gRPC、GraphQL 等协议类型的路由处理。
Koatty 4.0 引入了路由器工厂模式,提供灵活的路由器创建和管理:
import { RouterFactory, RegisterRouter } from "koatty_router";

const factory = RouterFactory.getInstance();

// 获取支持的协议
console.log(factory.getSupportedProtocols());
// ['http', 'https', 'ws', 'wss', 'grpc', 'graphql']

// 创建路由器
const router = factory.create("http", app, { prefix: "/api" });

// 注册自定义路由器
@RegisterRouter("mqtt")
class MqttRouter implements KoattyRouter {
  // 自定义路由器实现
}@Controller()装饰器的参数作为控制器访问入口,参数默认值为/。然后再遍历该控制器的方法上的装饰器GetMaping、
DeleteMaping、PutMaping、PostMaping等进行方法路由注册。
例如:
@Controller("/admin")
export class AdminController {
    ...
    @GetMapping("/test")
    test(){
        ...
    }
    ...
}
上述代码注册了路由 /admin/test ==> AdminController.test();
注意:在gRPC服务中,@Controller绑定的路由必须同proto定义的serviceName相同。例如@Controller("/Book")绑定的是 proto中的 service Book。
用于控制器方法绑定路由 参考装饰器章节
方法路由的装饰器有 @GetMapping、@PostMapping、@DeleteMapping、@PutMapping、@PatchMapping、@OptionsMapping、@HeadMapping、@RequestMapping
注意:在gRPC服务中,请使用 @PostMapping 或者 @RequestMapping进行绑定,并且@RequestMapping(path) 中的path必须同proto定义中的方法名一致;在WebSocket服务中,请使用 @GetMapping 或者 @RequestMapping进行绑定。
在方法路由中,有一种特殊的参数路由,可以方便实现RESTful API。
@Controller("/admin")
export class AdminController {
    ...
    @GetMapping("/test/:id") //在方法装饰器中,申明参数
    test(@PathVariable("id") id: number){ // 使用PathVariable获取绑定的参数
        ...
    }
    ...
}koatty的路由组件koatty_router基于@koa/router实现(gRPC除外),详细路由相关教程请参考 @koa/router
在项目 src/config/router.ts 存放着路由自定义配置,该配置用于初始化路由实例。
export default {
    prefix: string;           // 路由前缀
    methods?: string[];       // 支持的 HTTP 方法
    routerPath?: string;      // 路由路径
    sensitive?: boolean;      // 大小写敏感
    strict?: boolean;         // 严格匹配
    payload?: PayloadOptions; // 载荷解析选项

    // 协议特定扩展配置 (使用协议名作为键)
    ext?: {
      http?: {};                        // HTTP协议配置 (可选)
      grpc?: GrpcExtOptions;            // gRPC协议配置 (可选)
      ws?: WebSocketExtOptions;         // WebSocket协议配置 (可选)
      graphql?: GraphQLExtOptions;      // GraphQL协议配置 (可选)
    }
};注意: 从 Koatty 4.0 开始,
ext配置改为使用协议名作为键的方式,以便更好地支持多协议配置。例如ext.grpc、ext.ws、ext.graphql等。
协议特定扩展配置选项:
gRPC 配置选项 (GrpcExtOptions):
{
  protoFile: string;           // gRPC proto 文件路径(必需)
  poolSize?: number;           // 连接池大小,默认10
  batchSize?: number;          // 批处理大小,默认10
  streamConfig?: {             // 流配置
    maxConcurrentStreams?: number;    // 最大并发流数量,默认50
    streamTimeout?: number;           // 流超时时间(ms),默认60秒
    backpressureThreshold?: number;   // 背压阈值(字节),默认2048
  };
  enableReflection?: boolean;  // 是否启用反射,默认false
}
WebSocket 配置选项 (WebSocketExtOptions):
{
  maxFrameSize?: number;        // 最大分帧大小(字节),默认1MB
  heartbeatInterval?: number;   // 心跳检测间隔(ms),默认15秒
  heartbeatTimeout?: number;    // 心跳超时时间(ms),默认30秒
  maxConnections?: number;      // 最大连接数,默认1000
  maxBufferSize?: number;       // 最大缓冲区大小(字节),默认10MB
}
GraphQL 配置选项 (GraphQLExtOptions):
{
  schemaFile: string;          // GraphQL Schema 文件路径(必需)
  playground?: boolean;        // 启用 GraphQL Playground,默认false
  introspection?: boolean;     // 启用内省查询,默认true
  debug?: boolean;             // 调试模式,默认false
  depthLimit?: number;         // 查询深度限制,默认10
  complexityLimit?: number;    // 查询复杂度限制,默认1000
  // 可选: HTTP/2 相关配置
  // keyFile?: string;         // SSL 密钥文件路径
  // crtFile?: string;         // SSL 证书文件路径
  // http2?: { maxConcurrentStreams?: number }
}协议特定扩展配置示例:
export default {
    ext: {
        grpc: {
            protoFile: "./resource/proto/Hello.proto",  // gRPC proto 文件
            poolSize: 10,                               // 连接池大小
            streamConfig: {
                maxConcurrentStreams: 50,               // 最大并发流数量
                streamTimeout: 60000                    // 流超时时间(ms)
            }
        }
    }
};export default {
ext: {
ws: {
maxFrameSize: 1024 * 1024, // 最大分帧大小 1MB
heartbeatInterval: 15000, // 心跳检测间隔 15秒
maxConnections: 1000 // 最大连接数
}
}
};export default {
ext: {
graphql: {
schemaFile: "./resource/graphql/schema.graphql", // GraphQL Schema 文件
playground: true, // 启用 GraphQL Playground
introspection: true, // 启用内省查询
depthLimit: 10, // 查询深度限制
complexityLimit: 1000 // 查询复杂度限制
}
}
};当服务器运行多个协议时,使用协议名作为键来配置各协议的扩展参数:
// config/router.ts - 多协议配置示例
export default {
    payload: {
        extTypes: {
            json: ['application/json'],
            form: ['application/x-www-form-urlencoded'],
            grpc: ['application/grpc'],
            graphql: ['application/graphql+json'],
            websocket: ['application/websocket']
        },
        limit: '20mb',
        encoding: 'utf-8',
    },
    ext: {
        http: {},  // HTTP 协议(无特殊配置)
        grpc: {
            protoFile: "./resource/proto/service.proto",
            poolSize: 10,
            streamConfig: { maxConcurrentStreams: 50 }
        },
        graphql: {
            schemaFile: "./resource/graphql/schema.graphql",
            playground: true,
            introspection: true,
            // 可选: 启用 HTTP/2
            // keyFile: "./ssl/server.key",
            // crtFile: "./ssl/server.crt"
        },
        ws: {
            maxFrameSize: 1024 * 1024,
            heartbeatInterval: 15000,
            maxConnections: 1000
        }
    }
};-
@Controller()装饰器有两个作用,一是声明bean的类型是控制器;二是绑定控制器路由。如果使用@Controller()装饰器的时候没有指定path(没有参数),默认参数值为"/"
-
方法路由装饰器仅可用于控制器类的方法。
-
方法路由装饰器可以给同一个方法添加多次。但是@Controller()装饰器同一个类仅能使用一次。
-
如果绑定的路由存在重复,按照IOC容器中控制器类的加载顺序,第一个加载的路由规则生效。需要注意此类问题。在后续版本中可能会增加优先级的特性来控制。
-
路由支持正则,支持参数绑定(gRPC服务中不可用)。详细路由相关教程请参考 @koa/router
Koatty 4.0 完整支持 gRPC 的四种流类型:服务器流、客户端流、双向流和单向流。
@GrpcController()
export class StreamController {

  // 服务器流
  async serverStream(ctx: any) {
    for (let i = 0; i < 10; i++) {
      ctx.writeStream({ data: `Message ${i}` });
      await new Promise(resolve => setTimeout(resolve, 100));
    }
    ctx.endStream();
  }

  // 客户端流
  async clientStream(ctx: any) {
    // 接收客户端发送的多个消息
    if (ctx.streamMessage) {
      const result = processMessage(ctx.streamMessage);
      return { result };
    }
  }

  // 双向流
  async bidirectionalStream(ctx: any) {
    // 实时响应客户端消息
    if (ctx.streamMessage) {
      const response = processMessage(ctx.streamMessage);
      ctx.writeStream(response);
    }
  }
}
gRPC 流特性:
- 🔄 自动流类型检测 - 无需手动指定流类型
- 🚦 背压控制 - 防止内存溢出和性能问题
- ⚡ 并发管理 - 限制同时活跃的流数量
Koatty 4.0 引入了 RouterMiddlewareManager,专注于路由级别的中间件注册、组合和条件执行。
- 🎯 路由级别隔离 - 每个路由的中间件实例独立配置
- 🔧 智能实例管理 - 使用
${middlewareName}@${route}#${method}格式的唯一标识 - ⚡ 预组合优化 - 注册时组合中间件,提升运行时性能
- 🔄 异步中间件类 - 完整支持异步
run方法
具体使用方法见中间件章节
Koatty是基于 Koa 实现的,所以 Koatty 的中间件形式和 Koa 的中间件形式本质上是一样的,都是基于洋葱圈模型。每次我们编写一个中间件,就相当于在洋葱外面包了一层。
Koatty框架默认加载了trace、payload等中间件,能够满足大部分的Web应用场景。用户也可以自行增加中间件进行扩展。
和Koa中间件不太一样的是,Koatty中间件使用了class的形式来书写,并且使用使用@Middleware来声明组件类型。
中间件类必须要包含名为run(options: any, app: App)的方法。该方法在应用启动的时候会被调用执行,并且返回值是一个function (ctx: any, next: any){},这个function才是Koa中间件的格式。
使用命令行工具koatty_cli,在命令行执行命令:
//jwt 为自定义中间件名
kt middleware jwt
会自动在项目目录生成文件 src/middleware/JwtMiddleware.ts
生成的中间件代码模板:
/**
 * Middleware
 * @return
 */

import { Middleware, Helper } from "koatty";
import { App } from '../App';

@Middleware()
export class JwtMiddleware {
    run(options: any, app: App) {
	// 返回中间件之前的逻辑, 例如读取配置等
	...
	return function (ctx: any, next: any){
            // 在此实现中间件逻辑
	    ...
	}
    }
}
修改项目中间件配置 src/config/middleware.ts
list: ['JwtMiddleware'], //加载的中间件列表
config: { //中间件配置
	JwtMiddleware: {
		//中间件配置项
	}
}从 3.14.x 版本开始,中间件可以绑定到特定协议,只在指定协议的请求中执行:
// 仅在 HTTP/HTTPS 协议中执行的中间件
@Middleware({ protocol: ["http", "https"] })
export class HttpOnlyMiddleware {
  run(options: any, app: App) {
    return async (ctx: KoattyContext, next: Function) => {
      // 此中间件只在 HTTP/HTTPS 协议中运行
      console.log('HTTP request:', ctx.url);
      await next();
    };
  }
}

// 在多个协议中执行的中间件
@Middleware({ protocol: ["http", "grpc", "ws"] })
export class MultiProtocolMiddleware {
  run(options: any, app: App) {
    return async (ctx: KoattyContext, next: Function) => {
      // 根据协议类型执行不同逻辑
      if (ctx.protocol === 'grpc') {
        // gRPC 特定逻辑
      } else if (ctx.protocol === 'websocket') {
        // WebSocket 特定逻辑
      } else {
        // HTTP 特定逻辑
      }
      await next();
    };
  }
}

// 在所有协议中执行(默认行为)
@Middleware()
export class UniversalMiddleware {
  run(options: any, app: App) {
    return async (ctx: KoattyContext, next: Function) => {
      // 此中间件在所有协议中运行
      await next();
    };
  }
}路由级别中间件可以通过装饰器直接配置到控制器或方法上:
import { Controller, GetMapping, PostMapping, Middleware } from "koatty";

// 控制器级别中间件
@Controller('/api', [AuthMiddleware])
export class UserController {

  @GetMapping('/users')
  getUsers() {
    return 'users list';
  }

  // 方法级别中间件
  @PostMapping('/admin', {
    middleware: [RateLimitMiddleware]
  })
  adminAction() {
    return 'admin action';
  }
}使用 withMiddleware 函数配置优先级、条件、元数据等高级特性:
import { Controller, GetMapping, PostMapping, withMiddleware } from "koatty";

@Controller('/api')
export class UserController {

  @GetMapping('/users', {
    middleware: [
      withMiddleware(AuthMiddleware, {
        priority: 100,
        metadata: { role: 'admin' }
      }),
      withMiddleware(RateLimitMiddleware, {
        priority: 90,
        conditions: [
          { type: 'header', value: 'x-api-key', operator: 'contains' }
        ]
      })
    ]
  })
  getUsers() {
    return 'users list';
  }

  // 条件中间件
  @PostMapping('/admin', {
    middleware: [
      withMiddleware(AuthMiddleware, {
        priority: 100,
        conditions: [
          { type: 'header', value: 'x-admin-token', operator: 'contains' }
        ]
      })
    ]
  })
  adminAction() {
    return 'admin action';
  }
}通过 metadata 为中间件传递配置参数:
import { withMiddleware } from "koatty";

@Controller('/api')
export class RateLimitController {

  @GetMapping('/rate-limited', {
    middleware: [
      withMiddleware(RateLimitMiddleware, {
        priority: 100,
        metadata: {
          limit: 100,           // 每分钟最大请求数
          window: 60000,        // 时间窗口(毫秒)
          keyGenerator: 'ip'    // 限流键生成策略
        }
      })
    ]
  })
  rateLimitedEndpoint() {
    return 'rate limited endpoint';
  }
}
中间件类接收配置:
class RateLimitMiddleware {
  async run(config: any, app: any) {
    const {
      limit = 60,
      window = 60000,
      keyGenerator = 'ip'
    } = config;

    return async (ctx: KoattyContext, next: KoattyNext) => {
      const key = keyGenerator === 'ip' ? ctx.ip : ctx.user?.id;

      if (await this.isRateLimited(key, limit, window)) {
        ctx.status = 429;
        ctx.body = { error: 'Rate limit exceeded' };
        return;
      }

      await next();
    };
  }
}
优先级规划建议:
- 100+: 认证和授权中间件
- 90-99: 限流和安全中间件
- 80-89: 验证和数据处理中间件
- 70-79: 日志和监控中间件
- 50-69: 业务逻辑中间件
对于项目中自行开发中间件,如果要禁用,只需要修改中间件配置文件即可:
src/config/middleware.ts
list: [], //列表中没有PassportMiddleware,因此Passport中间件不会执行
config: { //中间件配置
	'PassportMiddleware': {...},
}通过 enabled: false 配置可以禁用中间件的执行:
- 控制器级别禁用:控制器下所有路由都不执行该中间件
- 方法级别禁用:只有该方法不执行指定的中间件(仅限控制器已声明的中间件)
- 方法级别添加:可以添加控制器未声明的中间件,仅在该方法中生效
import { Controller, GetMapping, PostMapping, PutMapping, withMiddleware } from "koatty";

@Controller('/api', [
  AuthMiddleware,
  withMiddleware(RateLimitMiddleware, { enabled: false }), // 控制器级别禁用
  LoggingMiddleware
])
export class UserController {

  @GetMapping('/users')
  async getUsers() {
    // 执行 AuthMiddleware 和 LoggingMiddleware
  }

  @PostMapping('/users', [
    withMiddleware(AuthMiddleware, { enabled: false }), // 方法级别禁用
    ValidationMiddleware // 方法级别添加
  ])
  async createUser() {
    // 执行 LoggingMiddleware 和 ValidationMiddleware
  }

  @PutMapping('/users/:id', [
    withMiddleware(AuthMiddleware, { enabled: false }),     // 禁用认证
    withMiddleware(AdminAuthMiddleware, { priority: 80 })   // 添加管理员认证
  ])
  async updateUser() {
    // 只执行 AdminAuthMiddleware
  }
}Koatty支持使用koa的中间件(包括koa1.x及2.x的中间件):
src/middleware/PassportMiddleware.ts
const passport = require('koa-passport');


@Middleware()
export class PassportMiddleware {
    run(options: any, app: App) {
        return passport.initialize();
    }
}
挂载并配置使用:
src/config/middleware.ts
list: ['PassportMiddleware'], //加载的中间件列表
config: { //中间件配置
	'PassportMiddleware': {
		//中间件配置项
	}
}Koatty兼容支持express的中间件,用法同上文koa中间一样,框架会自动识别进行兼容转换。
如果项目使用的protocol协议为grpc、ws、wss等非HTTP/S协议,中间件需要注意ctx的部分属性会不一致,例如ctx.header在grpc下不存在,具体可用属性会在gRPC和WebSocket章节说明。
Koatty 支持多种协议的控制器,每种协议使用不同的装饰器声明。控制器类默认放在项目的src/controller文件夹内,支持使用子文件夹进行归类。Koatty控制器类必须实现接口IController。
Koatty 为不同协议提供了专用的控制器装饰器:
@Controller()- HTTP/HTTPS/HTTP2 协议控制器@GrpcController()- gRPC 协议控制器@GraphQLController()- GraphQL 协议控制器(基于 HTTP/HTTPS)@WsController()- WebSocket 协议控制器
使用koatty_cli命令行工具:
单模块模式:
kt controller index //默认http协议

//
kt controller -t http index
kt controller -t grpc index
kt controller -t ws index
kt controller -t graphql index
会自动创建 src/controller/IndexController.ts文件。
多模块模式:
kt controller admin/index会自动创建 src/controller/Admin/IndexController.ts文件。
import { Controller, GetMapping } from "koatty";
import { App } from '../../App';

@Controller("/")
export class IndexController {
    app: App;
    ctx: KoattyContext;

    /**
     * constructor
     *
     */
    constructor(ctx: KoattyContext) {
      this.ctx = ctx;
    }

    @GetMapping("/")
    index() {
        return this.ok('Hello, Koatty!');
    }
}import { GrpcController, PostMapping, RequestBody, Validated } from "koatty";
import { App } from '../App';
@GrpcController('/Hello') // 必须与 proto 中的 service 名称一致
export class HelloController {
app: App;
ctx: KoattyContext;
constructor(ctx: KoattyContext) {
  this.ctx = ctx;
}
@PostMapping('/SayHello') // 必须与 proto 中的方法名一致
@Validated() // 参数验证
async sayHello(@RequestBody() params: SayHelloRequestDto): Promise<SayHelloReplyDto> {
const res = new SayHelloReplyDto();
res.message = `Hello, ${params.name}!`;
return res;
}
}import { GraphQLController, GetMapping, PostMapping, RequestParam } from "koatty";
import { App } from '../App';
@GraphQLController('/graphql')
export class UserController {
app: App;
ctx: KoattyContext;
constructor(ctx: KoattyContext) {
this.ctx = ctx;
}
// Query 操作
@GetMapping()
async getUser(@RequestParam() id: string): Promise<User> {
return { id, name: 'GraphQL User' };
}
// Mutation 操作
@PostMapping()
async createUser(@RequestParam() input: UserInput): Promise<User> {
return { id: input.id, name: input.name };
}
}import { WsController, GetMapping, RequestBody } from "koatty";
import { App } from '../App';
@WsController('/ws')
export class ChatController {
app: App;
ctx: KoattyContext;
constructor(ctx: KoattyContext) {
this.ctx = ctx;
}
@GetMapping("/")
async message(@RequestBody() data: any) {
// WebSocket 消息处理
return { type: 'response', data: data };
}
}-
控制器类必须实现接口 IController
-
控制器类构造方法第一个入参必须是
ctx: KoattyContext, 且构造方法内需要给ctx属性赋值:
constructor(ctx: KoattyContext) {
this.ctx = ctx;
}- 根据软件分层架构, 控制器不能被其他控制器调用(确实需要调用的,将逻辑下沉到Service层进行代码复用), 也不能被其他组件引用(反模式)
koatty解析和处理request参数后,在控制器中我们可以通过以下方法进行获取参数值:
- QueryString参数
通过@Get装饰器获取:
...
  @GetMapping("/get")
  async get(@Get("id") id: number): Promise<any> {
    console.log(id);
  }
...
通过@RequestParam装饰器获取:
...
  @GetMapping("/get")
  async get(@RequestParam("id") id: number): Promise<any> {
    console.log(id);
  }
...
通过ctx.query获取:
...
  @GetMapping("/get")
  async get(): Promise<any> {
    console.log(this.ctx.query["id"]);
  }
...- RESTful API参数
通过@PathVariable装饰器获取:
  ...
  @GetMapping("/test/:id") //在方法装饰器中,申明参数
  test(@PathVariable("id") id: number){ // 使用PathVariable获取绑定的参数
      ...
  }
  ...
通过ctx.requestParam获取:
  ...
  @GetMapping("/test/:id") //在方法装饰器中,申明参数
  test(){ // 使用PathVariable获取绑定的参数
      console.log(this.ctx.requestParam["id"]);...
  }
...- Body参数
通过@Post装饰器获取:
...
  @PostMapping("/post")
  async post(@Post("id") id: number): Promise<any> {
    console.log(id);
  }
...
通过@RequestBody装饰器获取:
...
  @PostMapping("/post")
  async post(@RequestBody() body: any): Promise<any> {
    console.log(body.post);
  }
...
通过ctx.requestBody获取:
...
  @PostMapping("/post")
  async post(): Promise<any> {
    console.log(ctx.requestBody.post);
  }
...
RequestBody装饰器获取的值包括表单参数以及上传的文件对象
- 上传文件
通过@File装饰器获取:
...
  @PostMapping("/post")
  async post(@File("filename") fileObject: any): Promise<any> {
    console.log(fileObject);
  }
...
通过@RequestBody装饰器获取:
...
  @PostMapping("/post")
  async post(@RequestBody() body: any): Promise<any> {
    console.log(body.file);
  }
...
通过ctx.requestBody获取:
...
  @PostMapping("/post")
  async post(): Promise<any> {
    console.log(ctx.requestBody.file);
  }
...- HTTP header
通过@Header装饰器获取:
...
  @PostMapping("/get")
  async get(@Header("x-access-token") token: string): Promise<any> {
    console.log(token);
  }
...
通过ctx.get获取:
...
  @PostMapping("/get")
  async get(): Promise<any> {
    const token = this.ctx.get("x-access-token");
    console.log(token);
  }
...
通过ctx.header获取:
...
  @PostMapping("/get")
  async get(): Promise<any> {
    console.log(this.ctx.header);
  }
...类之间的引用遵循Typescript的作用域 private | protected | public, 如果未显式声明,类方法的作用域为public。
只要给控制器类方法绑定了路由,那么方法即可被url映射访问(即使该方法的作用域不是public)。这是因为目前通过反射无法获取到方法的作用域关键字(有知道的请告诉我😁),暂时未实现URL访问作用域控制。
控制器属性及方法请参考 BaseController API
简单来说,Service 就是在复杂业务场景下用于做业务逻辑封装的一个抽象层,提供这个抽象有以下几个好处:
- 保持 Controller 中的逻辑更加简洁。
- 保持业务逻辑的独立性,抽象出来的 Service 可以被多个 Controller 重复调用。
- 将逻辑和展现分离,更容易编写测试用例
Koatty中服务类使用@Service()装饰器声明。服务类默认放在项目的src/service文件夹内,支持使用子文件夹进行归类。Koatty服务类必须实现接口IService。
使用koatty_cli命令行工具:
kt service test会自动创建src/service/test.js,生成的模板代码:
import { Service, Autowired, Scheduled, Cacheable } from "koatty";
import { App } from '../App';

@Service()
export class TestService  {
    app: App;

    //实现test方法
    test(name: string) {
        return name;
    }
}通过装饰器注入:
@Autowired()
testService: TestService;
通过IOC容器获取:
this.testService = IOCContainer.get("TestService", "SERVICE");调用服务类方法:
this.testService.test();持久层负责将服务层中的业务对象持久化到数据库中,ORM封装对数据库的访问操作,直接把对象映射到数据库。
持久层是一种业务逻辑分层,在框架中并不是必须的。 持久层在框架IOC容器的类型是
COMPONENT。 框架启动时持久层会同插件一起加载。 在插件中,是可以引用持久层的。 Koatty目前默认支持TypeORM。如需使用其他类型的ORM,例如sequelize、mongose等,可以参考koatty_typeorm插件自行实现。
通过koatty_cli命令行工具创建数据模型以及实体:
kt model test该工具会自动创建实体类UserEntity以及模型类UserModel:
@Component()
@Entity('user') // 对应数据库表名
export class UserEntity extends BaseEntity {

  @PrimaryGeneratedColumn()
  id: number;

  @Column()
  name: string;

  @CreateDateColumn()
  createdDate: Date;

  @UpdateDateColumn()
  updatedDate: Date;
}模型类UserModel中已经自动生成了CURD常见的数据操作方法,甚至还有分页。
除此之以外,还会在plugin目录自动引入koatty_typeorm插件,需要在插件列表中加载。
在service类或其他组件中,可以通过装饰器注入:
@Autowired()
userModel: UserModel;
通过IOC容器获取:
this.userModel = IOCContainer.get("UserModel", "COMPONENT");调用模型类方法:
this.userModel.Find();在项目的plugin配置 config/plugin.ts 中,修改数据库相关配置项:
// src/config/plugin.ts
export default {
  list: ['TypeormPlugin'], // 加载的插件列表,执行顺序按照数组元素顺序
  config: { // 插件配置
    TypeormPlugin: {
        //默认配置项
        "type": "mysql", //mysql, mariadb, postgres, sqlite, mssql, oracle, mongodb, cordova
        host: "127.0.0.1",
        port: 3306,
        username: "test",
        password: "test",
        database: "test",

        "synchronize": false, //true 每次运行应用程序时实体都将与数据库同步
        "logging": true,
        "entities": [`${process.env.APP_PATH}/model/*`],
        "entityPrefix": ""
    }
  },
};
为了方便管理,我们也可以将数据库配置统一放到 config/db.ts内(需要删除 config/plugin.ts 中TypeormPlugin配置):
export default {
    /*database config*/
    "DataBase": { // used koatty_typeorm
        //默认配置项
        "type": "mysql", //mysql, mariadb, postgres, sqlite, mssql, oracle, mongodb, cordova
        host: "${mysql_host}",
        port: "${mysql_port}",
        username: "${mysql_user}",
        password: "${mysql_pass}",
        database: "${mysql_database}",

        "synchronize": false, //true 每次运行应用程序时实体都将与数据库同步
        "logging": true,
        "entities": [`${process.env.APP_PATH}/model/*`],
        "entityPrefix": ""
    },

    "CacheStore": {
        type: "memory", // redis or memory
        // key_prefix: "koatty",
        // host: '127.0.0.1',
        // port: 6379,
        // name: "",
        // username: "",
        // password: "",
        // db: 0,
        // timeout: 30,
        // pool_size: 10,
        // conn_timeout: 30
    },

};插件机制是在保证框架核心的足够精简、稳定的前提下,对框架进行底层扩展。
我们在使用中间件的过程中,发现一些问题:
-
中间件的定位是拦截用户请求,并在它前后做一些事情,例如:鉴权、安全检查、访问日志等等。但实际情况是,有些功能是和请求无关的,例如:定时任务、消息订阅、后台逻辑等等。
-
有些功能包含非常复杂的初始化逻辑,需要在应用启动的时候完成。这显然也不适合放到中间件中去实现。
综上所述,我们需要一套更加强大的机制,来管理、编排那些相对独立的业务逻辑。典型的应用场景就是注册中心注册、向配置中心拉取配置等。
在框架IOC容器中,插件是一种特殊的
COMPONENT类型插件应尽量保持独立性,不和其他组件发生耦合
在必要的情况下,插件可以调用持久层(操作数据库及缓存等)。但是不能调用服务层、中间件以及控制器,也不能被其他组件调用
插件一般通过 npm 模块的方式进行复用:
npm i koatty_apollo --save使用koatty_cli在应用中创建一个插件类:
kt plugin apollo生成的插件代码模板:
import { Plugin, IPlugin } from 'koatty';
import { App } from '../App';
import { Apollo } from 'koatty_apollo';

@Plugin()
export class ApolloPlugin {
  run(options: any, app: App) {
    return Apollo(options, app);
  }
}
然后需要在应用的 config/plugin.ts 中声明:
list: ['ApolloPlugin'], //加载的插件列表
config: { //插件配置
	'ApolloPlugin': {
		//插件配置项
	}
}对于项目中插件,如果要禁用,只需要修改插件配置文件即可:
src/config/plugin.ts
list: [], //列表中没有ApolloPlugin,因此ApolloPlugin插件不会执行

config: { //插件配置
	'ApolloPlugin': {...},
}Koatty 4.0 基于最新版的 koatty_validation,提供了强大的参数验证功能,支持中文本地化验证规则、自定义装饰器、性能缓存和错误处理。
- 高性能: 内置缓存机制,提升验证性能 70%+
- 中文支持: 内置中文验证规则(姓名、身份证、手机号等)
- 自定义装饰器: 支持装饰器工厂模式,轻松创建自定义验证器
- 性能监控: 内置性能监控和缓存统计
- 错误处理: 多语言错误信息支持
@Valid及@Validated装饰器仅适用于控制器类
@RequestMapping('/')
// 判断入参是否为email
index(@RequestBody() @Valid("IsEmail") body: string): Promise<any> {
  return this.ok('Hi Koatty');
}
@Validated装饰器需要配合Dto类使用:
  @RequestMapping('/SayHello')
  @Validated() // DTO参数验证装饰器
  SayHello(@RequestBody() params: SayHelloRequestDto): Promise<SayHelloReplyDto> {
    const res = new SayHelloReplyDto();
    return Promise.resolve(res);
  }
使用cli工具创建Dto类:
kt dto SayHelloRequestDto类增加验证规则:
@Component()
export class SayHelloRequestDto {
  @IsNotEmpty({ message: "手机号码不能为空" })
  phoneNum: string;

  ...

}Koatty 4.0 增强的 @Validated 装饰器支持异步和同步两种验证模式,以适应不同的应用场景:
异步模式(默认) - 适用于 Koatty 框架中,控制器方法的参数需要异步获取的场景:
class UserController {
  // 默认异步模式
  @Validated()
  async register(user: UserDTO) {
    // 框架流程:
    // 1. 框架接收 HTTP 请求
    // 2. 框架异步解析请求体,构造 UserDTO 实例
    // 3. 框架检测到 @Validated() 元数据
    // 4. 框架调用 checkValidated() 验证参数
    // 5. 验证通过后调用此方法
    return { success: true };
  }

  // 显式指定异步模式
  @Validated(true)
  async update(id: number, user: UserDTO) {
    return { success: true };
  }
}
同步模式 - 适用于单元测试或参数值已经准备好的场景:
class UserService {
  // 同步模式 - 立即验证
  @Validated(false)
  async createUser(user: UserDTO) {
    // 方法执行前已经完成验证
    return { success: true };
  }

  // 适用于多个参数的场景
  @Validated(false)
  async updateUser(id: number, user: UserDTO) {
    // 只验证类类型参数(UserDTO),基础类型(number)不验证
    return { success: true };
  }
}
模式选择建议:
| 场景 | 推荐模式 | 原因 |
|---|---|---|
| Koatty 框架控制器 | 异步 @Validated() |
参数需要异步获取 |
| 单元测试 | 同步 @Validated(false) |
参数已准备好,立即验证 |
| 独立服务/工具 | 同步 @Validated(false) |
不依赖框架,立即验证 |
| 框架拦截器 | 手动 checkValidated() |
完全控制验证时机 |
非控制器类型的bean内想要做参数验证,我们可以使用FunctionValidator及ClassValidator。
FunctionValidator:
// 直接抛出错误
FunctionValidator.IsNotEmpty(str, "cannot be empty");
FunctionValidator.Contains(str, {message: "must contain s", value: "s"});

// 返回 true or false
if (ValidFuncs.IsEmail(str)) {
  ....
}
ClassValidator:
class SchemaClass {
    @IsDefined
    id: number;

    @IsNotEmpty
    name: string;
}

const ins = new SchemaClass();
ins.name = "";
ClassValidator.valid(SchemaClass, ins, true).catch(err => {
    console.log(err);
})@IsCnName() // 中文姓名
@IsIdNumber() // 身份证号
@IsMobile() // 手机号
@IsZipCode() // 邮政编码
@IsPlateNumber() // 车牌号@IsNotEmpty() // 非空
@IsEmail() // 邮箱
@IsIP() // IP地址
@IsPhoneNumber() // 国际电话号码
@IsUrl() // URL
@IsHash() // 哈希值
@IsDate() // 日期@Gt(10) // 大于
@Gte(10) // 大于等于
@Lt(100) // 小于
@Lte(100) // 小于等于
@Equals('value') // 等于
@NotEquals('x') // 不等于@Contains('test') // 包含字符串
@IsIn(['a', 'b', 'c']) // 在数组中
@IsNotIn(['x', 'y', 'z']) // 不在数组中@Valid(rule, options) // 参数验证
@Validated() // DTO验证 (默认异步模式)
@Validated(true) // DTO验证 (异步模式)
@Validated(false) // DTO验证 (同步模式)
@Expose() // 暴露属性
@IsDefined() // 已定义(Expose别名)import { createSimpleDecorator, createParameterizedDecorator } from 'koatty_validation';
// 简单装饰器
export const IsPositiveInteger = createSimpleDecorator(
'IsPositiveInteger',
(value: any) => {
const num = Number(value);
return Number.isInteger(num) && num > 0;
},
'must be a positive integer'
);
// 带参数的装饰器
export const InRange = createParameterizedDecorator(
'InRange',
(value: any, min: number, max: number) => {
const num = Number(value);
return num >= min && num <= max;
},
'must be between $constraint1 and $constraint2'
);
// 使用自定义装饰器
class ProductDto {
@IsPositiveInteger()
quantity: number;
@InRange(0, 100)
discountPercent: number;
}import { createValidationDecorator } from 'koatty_validation';
// 复杂验证逻辑
export function IsStrongPassword(validationOptions?: ValidationOptions) {
return createValidationDecorator({
name: 'IsStrongPassword',
validator: (value: string) => {
const hasLowercase = /[a-z]/.test(value);
const hasUppercase = /[A-Z]/.test(value);
const hasNumbers = /\d/.test(value);
const hasSpecialChar = /[!@#$%^&*(),.?":{}|<>]/.test(value);
return value.length >= 8 && hasLowercase && hasUppercase && hasNumbers && hasSpecialChar;
},
defaultMessage: 'password must be at least 8 characters with uppercase, lowercase, number and special character',
requiresValue: false
})(validationOptions);
}import { setValidationLanguage, KoattyValidationError } from 'koatty_validation';
// 设置中文错误信息
setValidationLanguage('zh');
// 自定义错误处理
try {
await validate(userDto);
} catch (error) {
if (error instanceof KoattyValidationError) {
console.log('验证错误:', error.message);
console.log('错误详情:', error.errors);
}
}import { errorFormatter } from 'koatty_validation';
const errors = await validate(dto);
if (errors.length > 0) {
const formatted = errorFormatter(errors, 'zh');
console.log(formatted);
}koatty_validation定义了一系列常用的验证规则
除了内置规则,还可以自定义函数验证:
- 配合 @Valid 装饰器使用自定义函数:
@Controller('/api/login')
export class LoginController {
  ...

  async GetSignout(
    @Header("X-User-Token") @Valid((value: unknown) => {
    return value !== undefined && value !== null;
  }, { message: "value值不能为null或undefined"}) token: string) {
    // do something
  }
  ...

}- 配合 @Validated 装饰器使用自定义函数:
@Controller('/api/login')
export class LoginController {
  ...

  @Validated()
  async GetSignout(@Post() someObj: ObjectDto) {
    // do something
  }
  ...
}

// class ObjectDto
export class ObjectDto {
  ...
  @CheckFunc((value: unknown)=> {
    return value !== undefined && value !== null;
  }, { message: "用户名不能为空" })
  username: string;
  ...
}- Dto类中自定义 :
@Controller('/api/login')
export class LoginController {
  ...

  @Validated()
  async GetSignout(@Post() someObj: ObjectDto) {
    // call valid()
    if (!someObj.validUserName()) {
      throw new Exception("用户被禁用", 1004, 200);
    }
  }
  ...
}

// class ObjectDto
export class ObjectDto {
  ...
  @IsDefined()
  username: string;

  validUserName(): boolean {
    return this.username === "test";
  }
  ...
}Koatty框架封装了koatty_exception组件,用于处理项目中需要抛出错误的场景,支持用户定制化Exception类来处理不同的业务异常。
import { Exception, Output, CommonErrorCode } from 'koatty_exception';

// 创建基础异常
const error = new Exception('用户未找到', CommonErrorCode.RESOURCE_NOT_FOUND, 404);

// 链式调用设置异常属性
const customError = new Exception('验证失败')
  .setCode(CommonErrorCode.VALIDATION_ERROR)
  .setStatus(400)
  .setContext({
    requestId: 'req-123',
    path: '/api/users',
    method: 'POST'
  });

// 使用 Output 类格式化响应
const successResponse = Output.ok('操作成功', { id: 1, name: '张三' });
const errorResponse = Output.fail('操作失败', null, 1001);如果应用内并没有自定义异常处理,在程序运行时产生的异常,会被框架使用默认的拦截处理机制统一拦截处理。例如直接抛出了 Error,框架同样可以拦截。
// res: {"code":1,"message":"error"}
throw new Error("error");

// res: {"code":1000,"message":"error"}
throw new Exception("error", 1000);

// res: {"code":1000,"message":"error"}
ctx.throw("error", 1000);我们可以自定义异常处理类,这个类需要继承 Exception基类:
@ExceptionHandler() // 注册全局异常处理
export class BussinessException1 extends Exception {
    // 在handler内统一对异常进行处理
    async handler(ctx: KoattyContext): Promise<any> {
        // http协议下返回 ctx.res.end, 如果是gRPC协议可根据ctx.protocol进行判断处理
        return ctx.res.end(this.message);
    }
}

export class BussinessException2 extends Exception {
    // 在handler内统一对异常进行处理
    async handler(ctx: KoattyContext): Promise<any> {
        // http协议下返回 ctx.res.end, 如果是gRPC协议可根据ctx.protocol进行判断处理
        return ctx.res.end({code: this.code, message: this.message});
    }
}
在应用代码中,我们可以根据业务逻辑,抛出不同的异常:
// res: {"code":1,"message":"error"}
throw new BussinessException1("error");

// res: {"code":1000,"message":"error"}
throw new BussinessException2("error", 1000);从 Koatty 4.0 开始,koatty_exception 提供了 @Catch() 方法装饰器,用于在方法级别主动捕获错误并转换为 Exception。
import { Catch, Exception } from 'koatty_exception';

@Service()
class UserService {

  // 用法1: 基础用法 - 捕获所有错误转换为 Exception
  @Catch()
  async findUser(id: string): Promise<User> {
    return await this.userRepository.findById(id);
  }

  // 用法2: 指定错误码和消息(简写)
  @Catch(1001, '用户创建失败')
  async createUser(data: CreateUserDTO): Promise<User> {
    return await this.userRepository.create(data);
  }

  // 用法3: 使用自定义 Exception 类(简写)
  @Catch(ValidationException)
  async validateUser(data: UserDTO): Promise<boolean> {
    return await this.validator.validate(data);
  }

  // 用法4: 完整配置
  @Catch({
    code: 2001,
    status: 400,
    message: (err) => `操作失败: ${err.message}`,
    exception: BusinessException,
  })
  async updateUser(id: string, data: UpdateUserDTO): Promise<User> {
    return await this.userRepository.update(id, data);
  }

  // 用法5: 只捕获特定错误类型
  @Catch([TypeError, RangeError], { code: 3001, message: '参数类型错误' })
  async processData(data: unknown): Promise<void> {
    // 只捕获 TypeError 和 RangeError,其他错误继续向上抛出
  }
}| 选项 | 类型 | 默认值 | 说明 |
|---|---|---|---|
code |
number |
1 |
业务错误码 |
status |
number |
500 |
HTTP 状态码 |
message |
string | (err) => string |
原始错误消息 | 错误消息(支持动态生成) |
exception |
ExceptionConstructor |
Exception |
自定义异常类 |
catchTypes |
ErrorType[] |
捕获所有 | 只捕获的错误类型 |
transform |
(ex, err) => ex |
- | 错误转换回调 |
preserveStack |
boolean |
true |
是否保留原始堆栈 |
suppress |
boolean |
false |
是否抑制错误(不抛出) |
- 统一错误处理:在 Service 层统一捕获并转换底层错误
- 错误分类:将不同类型的错误转换为对应的业务异常
- 错误信息美化:为用户提供友好的错误提示
- 日志和追踪:通过 transform 回调添加上下文信息
koatty提供了一个装饰器 @ExceptionHandler()来注册全局的异常处理。
@ExceptionHandler() // 注册全局异常处理
export class BussinessException extends Exception {
    // 在handler内统一对异常进行处理
    async handler(ctx: KoattyContext): Promise<any> {
        // http协议下返回 ctx.res.end, 如果是gRPC协议可根据ctx.protocol进行判断处理
        return ctx.res.end(this.message);
    }
}
全局异常处理仅注册一次,多次注册自动覆盖。注册全局异常处理之后,除非主动抛出不同类型的异常,否则所有的异常均交给全局异常处理类拦截。
@ExceptionHandler()
export class MultiProtocolException extends Exception {
  async handler(ctx: KoattyContext): Promise<any> {
    // 根据协议类型进行不同的处理
    if (ctx.protocol === 'grpc') {
      // gRPC 协议处理
      return {
        code: this.code,
        message: this.message
      };
    } else if (ctx.protocol === 'websocket') {
      // WebSocket 协议处理
      ctx.websocket.send(JSON.stringify({
        error: this.code,
        message: this.message
      }));
      return;
    } else {
      // HTTP 协议处理(默认)
      ctx.status = this.status || 500;
      ctx.type = 'application/json';
      return ctx.res.end(JSON.stringify({
        code: this.code,
        message: this.message,
        context: this.context
      }));
    }
  }
}
...
async index(type: string) {
if (type == '1') {
// 指定BussinessException2处理异常
// res: {"code":1000,"message":"error"}
throw new BussinessException2("error", 1000);
} else {
// 未明确指定, 交给全局异常处理
// res: error
throw new Error("error", 1000);
}
}
...Koatty 使用 koatty_logger 作为日志组件,支持在 Controller、Service 等类中通过 @Log() 属性装饰器注入日志实例,无需手动 new Logger()。
应用若已使用 koatty_container,框架会在初始化 PropertyDecoratorManager 时自动注册 "Log" 装饰器,无需额外配置。若未使用容器,需在应用入口手动调用一次:
import { registerLogDecorator } from 'koatty_logger';
import { decoratorManager } from 'koatty_container';

registerLogDecorator(decoratorManager.property);在 Controller 或 Service 中通过 @Log() 注入全局默认日志实例:
import { Controller, GetMapping, QueryParam } from 'koatty_router';
import { Log } from 'koatty_logger';

@Controller('/api/users')
export class UserController {
  app: App;
  ctx: any;

  @Log()
  logger: any;

  @GetMapping('/')
  async getUsers(
    @QueryParam('page') page: number = 1,
    @QueryParam('limit') limit: number = 10
  ): Promise<any> {
    this.logger.info(`获取用户列表: page=${page}, limit=${limit}`);
    const result = await this.userService.findAll(page, limit);
    return { code: 200, message: '获取成功', data: result };
  }
}需要独立配置(如单独日志级别、文件路径)时,可传入 LoggerOpt,框架会按「类 + 属性」缓存同一实例:
import { Log } from 'koatty_logger';

@Service()
export class MyService {
  @Log() logger: any;  // 全局 DefaultLogger

  @Log({ logLevel: 'debug', logFilePath: './logs/service.log' })
  debugLogger: any;  // 独立 Logger 实例
}| 用法 | 说明 |
|---|---|
@Log() |
属性赋值为全局 DefaultLogger 单例 |
@Log(options) |
属性赋值为 new Logger(options) 的实例,同一类+属性共享同一实例 |
说明:未使用 koatty_container 时,@Log() 会静默不生效,不会影响现有代码。
Koatty封装了一个缓存库 koatty_cacheable,支持内存以及redis存储。 koatty_cacheable 提供了两个装饰器 CacheAble, CacheEvict。
使用 Koatty CLI 生成插件模板:
kt plugin Cacheable创建 src/plugin/Cacheable.ts:
import { Plugin, IPlugin, App } from "koatty";
import { KoattyCached } from "koatty_cacheable";

@Plugin()
export class Cacheable implements IPlugin {
  run(options: any, app: App) {
    return KoattyCached(options, app);
  }
}更新 src/config/plugin.ts:
export default {
  list: ["Cacheable"], // 插件加载顺序
  config: {
    Cacheable: {
      type: "memory", // 缓存类型: "redis" 或 "memory",默认为 "memory"
      db: 0,
      timeout: 30,
      // Redis 配置 (当 type 为 "redis" 时)
      // key_prefix: "koatty",
      // host: '127.0.0.1',
      // port: 6379,
      // name: "",
      // username: "",
      // password: "",
      // pool_size: 10,
      // conn_timeout: 30
    }
  }
};注意事项:
- 插件会在应用启动时自动初始化缓存
- 必须在插件配置中提供正确的缓存配置
- 如果缓存未正确初始化,装饰器方法会直接执行而不进行缓存(优雅降级)
import { CacheAble, CacheEvict, GetCacheStore } from "koatty_cacheable";

@Service()
export class TestService {

    // 自动缓存方法返回值
    @CacheAble("testCache", {
        params: ["id"],    // 使用 id 参数作为缓存键的一部分
        timeout: 300       // 缓存过期时间(秒),默认 300 秒
    })
    async getTest(id: string){
        //todo
    }

    // 自动清除相关缓存
    @CacheEvict("testCache", {
        params: ["id"],                    // 使用 id 参数定位要清除的缓存
        delayedDoubleDeletion: true        // 启用延迟双删策略,默认 true
    })
    async setTest(id: string){
        //todo
    }

    // 手动操作缓存
    async test(){
        // 自行操作缓存实例
        const store = await GetCacheStore(this.app);
        await store.set(key, value, 60);
        const value = await store.get(key);
        await store.del(key);
    }
}@Service()
export class ProductService {
// 无参数缓存
@CacheAble("productStats")
async getProductStats(): Promise<ProductStats> {
return await this.calculateStats();
}
// 多参数缓存
@CacheAble("productSearch", {
params: ["category", "keyword"],
timeout: 600
})
async searchProducts(category: string, keyword: string, page: number = 1): Promise<Product[]> {
return await this.productRepository.search(category, keyword, page);
}
// 立即清除缓存(不使用延迟双删)
@CacheEvict("productSearch", {
params: ["category"],
delayedDoubleDeletion: false
})
async updateProductCategory(category: string, updates: any): Promise<void> {
await this.productRepository.updateCategory(category, updates);
}
}- @CacheAble(cacheName: string, options?)
开启方法结果自动缓存。当执行该方法的时候,会先查找缓存,缓存结果存在直接返回结果,不存在则执行后返回并保持执行结果。
参数:
cacheName: string- 缓存名称options?: CacheAbleOpt- 缓存选项params?: string[]- 用作缓存键的参数名数组timeout?: number- 缓存过期时间(秒),默认 300
- @CacheEvict(cacheName: string, options?)
清除方法结果缓存。
参数:
cacheName: string- 要清除的缓存名称options?: CacheEvictOpt- 清除选项params?: string[]- 用于定位缓存的参数名数组delayedDoubleDeletion?: boolean- 是否启用延迟双删策略,默认 true
- GetCacheStore(app?)
获取缓存存储实例,可以手动调用get、set等方法操作缓存。
参数:
app?: Application- Koatty 应用实例
返回: Promise<CacheStore>
缓存键按以下格式生成:
{cacheName}:{paramName1}:{paramValue1}:{paramName2}:{paramValue2}...
例如:
@CacheAble("user", {params: ["id"]})+getUserById("123")→user:id:123- 当缓存键长度超过 128 字符时,会自动使用 murmur hash 进行压缩
延迟双删是一种解决缓存一致性问题的策略:
- 立即删除缓存
- 执行数据更新操作
- 延迟 5 秒后再次删除缓存
这样可以避免在并发场景下出现脏数据。
注意: @CacheAble以及@CacheEvict装饰器不能用于控制器类
Koatty封装了一个计划任务库 koatty_schedule,支持cron表达式以及基于redis的分布式锁。
使用 Koatty CLI 生成插件模板:
kt plugin Scheduled创建 src/plugin/Scheduled.ts:
import { Plugin, IPlugin, App } from "koatty";
import { KoattyScheduled } from "koatty_schedule";

@Plugin()
export class Scheduled implements IPlugin {
  run(options: any, app: App) {
    return KoattyScheduled(options, app);
  }
}更新 src/config/plugin.ts:
import { RedisMode } from "koatty_schedule";

export default {
  list: ["Scheduled"], // 插件加载顺序
  config: {
    Scheduled: {
      timezone: "Asia/Shanghai",  // 全局时区配置
      lockTimeOut: 10000,        // 锁超时时间(ms)
      maxRetries: 3,             // 获取锁最大重试次数
      retryDelayMs: 200,         // 重试延迟(ms)
      redisConfig: {
        mode: RedisMode.STANDALONE,  // Redis模式: STANDALONE | SENTINEL | CLUSTER
        host: "127.0.0.1",
        port: 6379,
        db: 0,
        keyPrefix: "koatty:schedule:"
        // password: "your-password",  // 可选
      }
    }
  }
};cron表达式支持5位或6位格式:
6位格式(推荐,包含秒):
┌────────────── second (0-59)
│ ┌──────────── minute (0-59)
│ │ ┌────────── hour (0-23)
│ │ │ ┌──────── day of month (1-31)
│ │ │ │ ┌────── month (1-12 or JAN-DEC)
│ │ │ │ │ ┌──── day of week (0-7 or SUN-SAT, 0 and 7 are Sunday)
│ │ │ │ │ │
* * * * * *
5位格式(不含秒):
┌──────────── minute (0-59)
│ ┌────────── hour (0-23)
│ │ ┌──────── day of month (1-31)
│ │ │ ┌────── month (1-12 or JAN-DEC)
│ │ │ │ ┌──── day of week (0-7 or SUN-SAT)
│ │ │ │ │
* * * * *
import { Scheduled, RedLock } from "koatty_schedule";

@Service()
export class TestService {

    // 每分钟执行一次
    @Scheduled("0 * * * * *")
    async test(){
        //todo
    }

    // 指定时区执行
    @Scheduled("0 0 2 * * *", "UTC") // 每天2点UTC时间执行
    async dailyTask(){
        //todo
    }
}在某些业务场景,计划任务是不能并发执行的,解决方案就是加锁。koatty_schedule实现了一个基于redis的分布式锁。
- RedLock(name?: string, options?: RedLockOptions)
  /**
   * 锁超时时间ms, 默认 10000
   */
  lockTimeOut?: number;
  /**
   * 获取锁最大重试次数, 默认3次
   */
  retryCount?: number;
  /**
   * redis 配置, 支持Standalone、 Sentinel、 Cluster
   */
  RedisOptions: RedisOptions;
例子:
import { Scheduled, RedLock } from "koatty_schedule";

export class TestService {

  @Scheduled("0 */10 * * * *")
  @RedLock("critical-task") // Prevents concurrent execution
  async criticalTask() {
    console.log("Running critical task with lock protection...");
    // Only one instance can execute this at a time
  }

  @RedLock("user-sync", {
    lockTimeOut: 30000,    // 30 seconds
    maxRetries: 5,         // Retry 5 times
    retryDelayMs: 500      // Wait 500ms between retries
  })
  async syncUsers() {
    console.log("Syncing users with lock protection...");
  }
}
需要注意几个点:
@Scheduled及@RedLock装饰器不能用于控制器类;
需要根据执行计划任务的时长来配置相应的参数,防止锁失效
当锁超时但业务逻辑未执行完时,锁会自动续期一次,续期时间到期后仍然未完成,锁会被释放
Koatty从 3.4.x版本开始支持gRPC服务。
使用koatty_cli命令行工具(>=3.4.6):
kt proto hello会自动创建 src/resource/proto/Hello.proto文件。根据实际情况进行修改
使用koatty_cli命令行工具(>=3.4.6):
单模块模式:
kt controller -t grpc hello会自动创建 src/controller/HelloController.ts文件。
多模块模式:
kt controller -t grpc admin/hello会自动创建 src/controller/Admin/HelloController.ts文件。
控制器模板代码如下:
import { KoattyContext, Controller, Autowired, RequestMapping, RequestBody } from 'koatty';
import { App } from '../App';
import { SayHelloRequestDto } from '../dto/SayHelloRequestDto';
import { SayHelloReplyDto } from '../dto/SayHelloReplyDto';

@Controller('/Hello') // Consistent with proto.service name
export class HelloController {
  app: App;
  ctx: KoattyContext;

  /**
   * Custom constructor
   *
   */
  constructor(ctx: KoattyContext) {
    this.ctx = ctx;
  }


  /**
   * SayHello 接口
   * 访问路径  grpc://127.0.0.1/Hello/SayHello
   *
   * @param {SayHelloRequestDto} data
   * @returns
   */
  @RequestMapping('/SayHello') // Consistent with proto.service.method name
  @Validated() // 参数验证
  SayHello(@RequestBody() params: SayHelloRequestDto): Promise<SayHelloReplyDto> {
    const res = new SayHelloReplyDto();
    return Promise.resolve(res);
  }

}
除控制器文件以外,Koatty还会自动创建RPC协议的输入输出Dto类,例如上文中的 SayHelloRequestDto以及 SayHelloReplyDto
修改 config/server.ts :
// config/server.ts
export default {
  hostname: '127.0.0.1',
  port: 50051,
  protocol: "grpc", // Server protocol 'http' | 'https' | 'http2' | 'grpc' | 'ws' | 'wss' | 'graphql'
  trace: false,
}
修改 config/router.ts :
// config/router.ts
export default {
    /**
     *  协议特定扩展配置(使用协议名作为键)
     */
    ext: {
        grpc: {
            protoFile: process.env.APP_PATH + "resource/proto/Hello.proto", // gRPC proto file
            poolSize: 10,
            streamConfig: {
                maxConcurrentStreams: 50,
                streamTimeout: 60000
            }
        }
    }
}
OK,现在可以启动一个gRPC服务器。
Koatty 从 3.14.x 版本开始集成了 OpenTelemetry 全链路追踪和 Prometheus 指标导出功能。
首先在 config/server.ts 中启用链路追踪:
// config/server.ts
export default {
  hostname: '127.0.0.1',
  port: 3000,
  protocol: "http",
  trace: true,  // 启用链路追踪
  // ...
}配置 OpenTelemetry(在中间件配置中):
import { Trace } from 'koatty_trace';

app.use(Trace({
  enableTrace: true,
  timeout: 10000,
  requestIdHeaderName: 'X-Request-Id',

  // OpenTelemetry 配置
  opentelemetryConf: {
    endpoint: "http://localhost:4318/v1/traces", // OTLP 端点
    enableTopology: false,            // 是否启用拓扑分析
    headers: {},                      // OTLP 请求头
    resourceAttributes: {             // 资源属性
      'service.name': 'my-service',
      'service.version': '1.0.0'
    },
    samplingRate: 1.0,               // 采样率
    timeout: 10000,                  // 导出超时时间
    spanTimeout: 30000,              // Span 超时时间
    maxActiveSpans: 1000,            // 最大活跃 Span 数
  }
}, app));启用多协议指标收集和导出:
import { Trace } from 'koatty_trace';

app.use(Trace({
  enableTrace: true,

  // Prometheus 指标配置
  metricsConf: {
    metricsEndpoint: '/metrics',    // 指标端点路径
    metricsPort: 9464,             // 指标服务端口
    reportInterval: 5000,          // 上报间隔(ms)
    defaultAttributes: {           // 默认标签
      service: 'my-service',
      version: '1.0.0',
      environment: 'production'
    }
  }
}, app));自动收集的指标:
- 类型: Counter
- 描述: 所有协议的请求总数统计
- 标签:
method: 请求方法 (GET, POST, PUT, DELETE等)status: 状态码 (HTTP状态码或gRPC状态码)path: 标准化的请求路径 (如/users/:id)protocol: 协议类型 (http,websocket,grpc)compression: 压缩类型 (WebSocket:deflate/none, gRPC:gzip/brotli/none)grpc_service: gRPC服务名 (仅gRPC协议)
- 类型: Counter
- 描述: 所有协议的错误请求统计
- 标签: 同上,增加
error_type- HTTP/WebSocket:
client_error(4xx),server_error(5xx) - gRPC:
grpc_error(非0状态码)
- HTTP/WebSocket:
- 类型: Histogram
- 描述: 所有协议的请求响应时间分布
- 单位: 秒
- 桶边界: [0.1, 0.5, 1, 2.5, 5, 10]
- 类型: Counter
- 描述: WebSocket 连接统计
访问指标:
curl http://localhost:9464/metricsPrometheus 配置示例 (prometheus.yml):
scrape_configs:
  - job_name: 'koatty-app'
    static_configs:
      - targets: ['localhost:9464']
    scrape_interval: 15s
    metrics_path: /metrics
Grafana 查询示例:
# 请求 QPS
rate(requests_total[5m])

# 错误率
rate(errors_total[5m]) / rate(requests_total[5m])

# 平均响应时间
rate(response_time_seconds_sum[5m]) / rate(response_time_seconds_count[5m])

# P95 响应时间
histogram_quantile(0.95, rate(response_time_seconds_bucket[5m]))
Koatty从 3.4.x版本开始支持WebSocket服务。
使用koatty_cli命令行工具(>=3.4.6):
单模块模式:
kt controller -t ws requst会自动创建 src/controller/RequstController.ts文件。
多模块模式:
kt controller -t ws admin/requst会自动创建 src/controller/Admin/RequstController.ts文件。
控制器模板代码如下:
import { KoattyContext, Controller, Autowired, GetMapping } from 'koatty';
import { App } from '../App';
// import { TestService } from '../service/TestService';

@Controller('/requst')
export class RequstController {
  app: App;
  ctx: KoattyContext;

  // @Autowired()
  // protected TestService: TestService;

  /**
   * Custom constructor
   *
   */
  constructor(ctx: KoattyContext) {
    this.ctx = ctx;
  }

  /**
   * index 接口
   * 访问路径  ws://127.0.0.1/requst
   *
   * @returns
   * @memberof RequstController
   */
  @RequestMapping('/')
  index(@RequestBody() @Valid("IsEmail") body: string): Promise<any> {
    return this.ok('Hi Koatty');
  }

}修改 config/server.ts :
// config/server.ts
export default {
  hostname: '127.0.0.1',
  port: 3000,
  protocol: "ws", // Server protocol 'http' | 'https' | 'http2' | 'grpc' | 'ws' | 'wss' | 'graphql'
  trace: false,
}
可选:修改 config/router.ts 配置 WebSocket 扩展参数:
// config/router.ts
export default {
    ext: {
        ws: {
            maxFrameSize: 1024 * 1024,     // 最大分帧大小 1MB
            heartbeatInterval: 15000,       // 心跳检测间隔 15秒
            heartbeatTimeout: 30000,        // 心跳超时时间 30秒
            maxConnections: 1000            // 最大连接数
        }
    }
}
OK,现在可以启动一个WebSocket服务器。
Koatty框架在应用启动过程中,app对象除koa自身包含的事件之外,还定义了一系列事件:
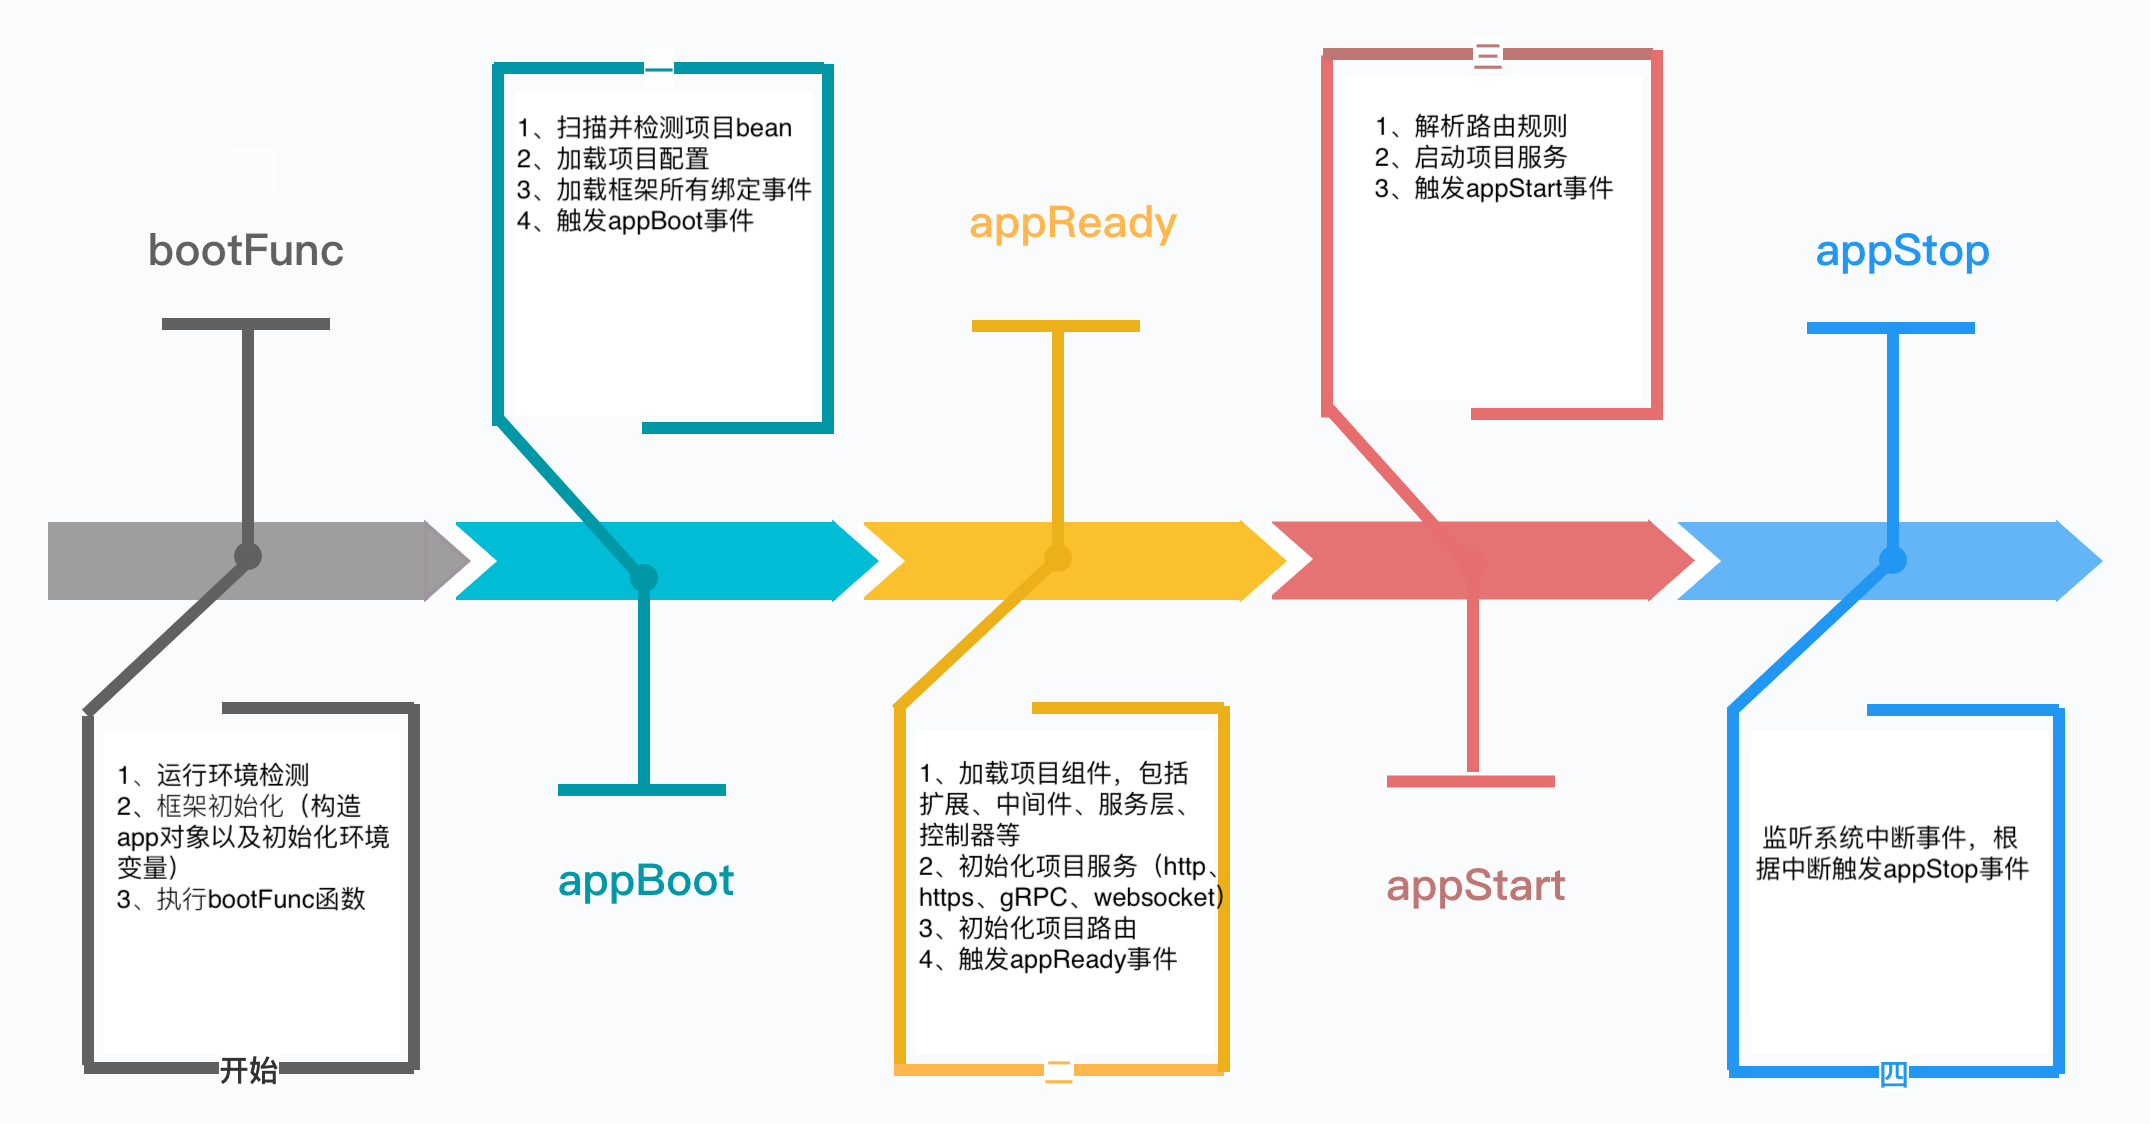
注意:
appStart阶段, 服务启动后才会触发appStart事件
我们可以根据项目需要绑定到不同的事件。例如在服务注册发现场景,如果硬件宕机,可以在appStop事件上绑定处理服务注销处理。
app.once("appStop", () => {
  //注销服务
  ...
})装饰器@Bootstrap的作用是声明的项目入口类,该装饰器支持传入一个函数作为参数,此函数在项目启动时会先执行。
@Bootstrap(
    //bootstrap function
    (app: any) => {
        // todo
    }
)
export class App extends Koatty {
  ...
}
常见的应用场景是启动之前处理一些运行环境设置,例如NODE_ENV等。启动函数支持异步。
注意: 启动函数执行时机在框架执行
initialize初始化之后,此时框架的相关路径属性(appPath、rootPath等)和process.env已经加载设置完成,但是配置及其他组件(插件、中间件、控制器等)并未加载,在定义启动函数的时候需要注意。
从 Koatty 4.0 开始,新增了 @OnEvent 装饰器,用于在 @Component 或 @Plugin 类中绑定方法到应用生命周期事件。这提供了一种更直观、更声明式的方式来处理应用生命周期。
支持的事件类型 (AppEvent):
| 事件名称 | 触发时机 | 说明 |
|---|---|---|
appBoot |
应用启动初始化后 | 配置加载完成,组件尚未加载 |
loadServe |
服务器加载时 | 创建服务器实例 |
loadRouter |
路由加载时 | 初始化路由 |
appReady |
应用准备就绪 | 所有组件加载完成,服务器即将启动 |
appStart |
应用启动完成 | 服务器已启动,开始接收请求 |
appStop |
应用停止时 | 优雅关闭,清理资源 |
使用示例:
import { Component, OnEvent, AppEvent, KoattyApplication } from "koatty";

@Component("MyComponent", {
  scope: 'user',
  priority: 50,
  description: '自定义组件示例'
})
export class MyComponent {

  // 在路由加载时执行
  @OnEvent(AppEvent.loadRouter)
  async initRouter(app: KoattyApplication) {
    console.log('路由初始化...');
    // 自定义路由初始化逻辑
  }

  // 应用准备就绪时执行
  @OnEvent(AppEvent.appReady)
  async onReady(app: KoattyApplication) {
    console.log('应用准备就绪');
    // 可以在这里进行服务注册、连接池初始化等
  }

  // 应用停止时执行
  @OnEvent(AppEvent.appStop)
  async cleanup(app: KoattyApplication) {
    console.log('清理资源...');
    // 关闭连接、释放资源
  }
}也可以在启动类中使用:
// src/bootstrap/TestBootStrap.ts
import { Component, OnEvent, AppEvent, KoattyApplication, Logger } from "koatty";

@Component()
export class TestBootStrap {

  @OnEvent(AppEvent.appBoot)
  async onBoot(app: KoattyApplication) {
    Logger.Info('应用启动中...');
    // 初始化环境配置
  }

  @OnEvent(AppEvent.appStart)
  async onStart(app: KoattyApplication) {
    Logger.Info('应用已启动');
    // 服务注册、健康检查等
  }
}重要限制:
@OnEvent装饰器 只能 用于@Component或@Plugin装饰的类- 不能用于
@Controller、@Service、@Middleware等其他类型的 Bean - 如果在不支持的类型中使用,框架会抛出错误提示
// ❌ 错误用法 - 不能在 Controller 中使用
@Controller('/api')
export class UserController {
  @OnEvent(AppEvent.appReady)  // 会抛出错误
  async onReady() {}
}

// ✅ 正确用法 - 在 Component 中使用
@Component()
export class UserComponent {
  @OnEvent(AppEvent.appReady)  // 正确
  async onReady() {}
}项目入口类还可以设置另外两个装饰器,它们分别是:
-
@ComponentScan('./') 声明项目组件的目录,默认为项目src目录,含所有的组件类型
-
@ConfiguationScan('./config') 声明项目的配置文件目录,默认为src/config目录
IoC全称Inversion of Control,直译为控制反转。在以ES6 Class范式编程中,简单的通过new创建实例并持有的方式,会发现以下缺点:
-
实例化一个组件,要先实例化依赖的组件,强耦合
-
每个组件都需要实例化一个依赖组件,没有复用
-
很多组件需要销毁以便释放资源,例如DataSource,但如果该组件被多个组件共享,如何确保它的使用方都已经全部被销毁
-
随着更多的组件被引入,需要共享的组件写起来会更困难,这些组件的依赖关系会越来越复杂
如果一个系统有大量的组件,其生命周期和相互之间的依赖关系如果由组件自身来维护,不但大大增加了系统的复杂度,而且会导致组件之间极为紧密的耦合,继而给测试和维护带来了极大的困难。
因此,核心问题是:
- 1、谁负责创建组件?
- 2、谁负责根据依赖关系组装组件?
- 3、销毁时,如何按依赖顺序正确销毁?
解决这一问题的核心方案就是IoC。参考Spring IOC的实现机制,Koatty实现了一个IOC容器(koatty_container),在应用启动的时候,自动分类装载组件,并且根据依赖关系,注入相应的依赖。因此,IoC又称为依赖注入(DI:Dependency Injection),它解决了一个最主要的问题:将组件的创建+配置与组件的使用相分离,并且,由IoC容器负责管理组件的生命周期。
智能元数据缓存:
- ✅ LRU 缓存机制 - 显著提升性能,减少反射操作 70%+
- ✅ 元数据预加载 - 启动时预加载,优化组件注册
- ✅ 版本冲突检测 - 自动检测和解决依赖版本冲突
- ✅ 循环依赖检测 - 循环依赖检测和解决建议
// 在 Loader.ts 中 - 元数据现在会预加载以获得最佳性能
IOC.preloadMetadata(); // 预加载所有元数据以填充缓存

// 智能缓存减少了 70%+ 的反射操作
// 缓存命中率:典型应用中约 95%性能提升:
- 反射操作减少 70%+
- 元数据访问缓存命中率 ~95%
- 启动性能提升 40%+
- 运行时性能提升 30%+
根据组件的不同应用场景,Koatty把Bean分为 'COMPONENT' | 'CONTROLLER' | 'MIDDLEWARE' | 'SERVICE' 四种类型。
-
COMPONENT 扩展类、第三方类属于此类型,例如 Plugin,ORM持久层等
-
CONTROLLER 控制器类
-
MIDDLEWARE 中间件类
-
SERVICE 逻辑服务类
通过Koatty框架核心的Loader,在项目启动时,会自动分析并装配Bean,自动处理好Bean之间的依赖问题。IOC容器提供了一系列的API接口,方便注册以及获取装配好的Bean。
随着项目规模的扩大,很容易出现循环依赖。koatty_container解决循环依赖的思路是延迟加载。koatty_container在 app 上绑定了一个 appReady 事件,用于延迟加载产生循环依赖的bean, 在使用IOC的时候需要进行处理:
//
app.emit("appReady");
注意:虽然延迟加载能够解决大部分场景下的循环依赖,但是在极端情况下仍然可能装配失败,解决方案:
1、尽量避免循环依赖,新增第三方公共类来解耦互相依赖的类
2、使用IOC容器获取类的原型(getClass),自行实例化
Koatty 4.0 基于增强版的 koatty_container 实现,提供强大的 IOC 容器、自定义装饰器管理、高性能缓存和完整的 AOP 支持。
- 自定义装饰器支持 - 强大的装饰器管理器,轻松扩展装饰器生态系统
- 高性能缓存 - WeakMap + LRU 策略,快速启动和运行时性能
- 智能循环依赖处理 - 优雅解决复杂依赖关系
- 完整 AOP 支持 - Before/After/Around 面向切面编程
- 多种注入方式 - 构造函数、属性、字符串标识符注入
import { IOC, Autowired, Component, Service } from "koatty_container";

@Component()
class UserRepository {
  async findById(id: string) {
    return { id, name: "John Doe", email: "john@example.com" };
  }
}

@Service()
class UserService {
  @Autowired()
  private userRepository: UserRepository;

  async getUser(id: string) {
    return await this.userRepository.findById(id);
  }
}

@Component()
class UserController {
  @Autowired()
  private userService: UserService;

  async handleRequest(id: string) {
    const user = await this.userService.getUser(id);
    return { success: true, data: user };
  }
}

// 注册组件
IOC.reg(UserRepository);
IOC.reg(UserService);
IOC.reg(UserController);

// 使用
const controller = IOC.get(UserController);
const result = await controller.handleRequest("123");async function initializeApp() {
const components = [
{ target: UserRepository },
{ target: UserService },
{ target: UserController },
{ target: EmailService },
{ target: OrderService }
];
// 批量注册,带性能优化
IOC.batchRegister(components, {
preProcessDependencies: true, // 预处理依赖
warmupAOP: true // 预热 AOP 缓存
});
// 性能统计
const stats = IOC.getDetailedPerformanceStats();
console.log(`🚀 初始化完成:`);
console.log(` - 组件数量: ${stats.containers.totalRegistered}`);
console.log(` - 依赖缓存命中率: ${(stats.lruCaches.dependencies.hitRate * 100).toFixed(1)}%`);
console.log(` - AOP 缓存命中率: ${(stats.lruCaches.aop.hitRates.overall * 100).toFixed(1)}%`);
}
await initializeApp();-
装饰器声明 通过@Before、@After、@BeforeEach、@AfterEach装饰器声明的切点
-
内置方法声明 通过__before、__after 内置隐藏方法声明的切点
两种声明方式的区别:
| 声明方式 | 依赖Aspect切面类 | 能否使用类作用域 | 入参依赖切点方法 | 优先级 | 使用限制 |
|---|---|---|---|---|---|
| 装饰器声明 | 依赖 | 不能 | 依赖 | 低 | 可用于所有类型的bean |
| 内置方法声明 | 不依赖 | 能 | 不依赖 | 高 | 只能用于CONTROLLER类型的bean |
依赖Aspect切面类:需要创建对应的Aspect切面类才能使用
能否使用类作用域:不能使用切点所在类的this指针
入参依赖切点方法:装饰器声明切点所在方法的入参同切面共享,内置方法声明的切点因为可以使用this,理论上能获取切点所在类的任何属性,更加灵活
注意: 如果类使用了装饰器@BeforeEach,且这个类还包含__before方法(不管是自身拥有还是继承自父类),那么__before方法优先级高于装饰器,该类的装饰器@BeforeEach无效(@AfterEach和__after也是一样)
例如:
@Controller('/')
export class TestController {
  app: App;
  ctx: KoattyContext;

  @Autowired()
  protected TestService: TestService;

  // 不依赖切面类
  async __before(): Promise<any> { // 不依赖具体方法的入参,自行通过this指针获取
      console.log(this.app)  // 可以使用类作用域,通过this指针获取当前类属性
      console.log(this.ctx)
  }

  @Before("TestAspect") // 依赖TestAspect切面类,能够获取path参数
  async test(path: string){

  }
}使用koatty_cli进行创建:
kt aspect test自动生成的模板代码:
import { Aspect } from "koatty";
import { App } from '../App';

@Aspect()
export class TestAspect {
    app: App;

    run() {
        console.log('TestAspect');
    }
}@Aspect()
export class LoggingAspect implements IAspect {
async run(args: any[], target?: any, options?: any): Promise<any> {
console.log(`🔍 调用 ${options?.targetMethod}`, args);
return Promise.resolve();
}
}
@Component()
class OrderService {
@Before(LoggingAspect, { level: 'info' })
async createOrder(orderData: any) {
return { orderId: Date.now(), ...orderData };
}
}@Aspect()
class TransactionAspect {
async run(args: any[], proceed: Function, options?: any): Promise<any> {
console.log(`🔄 开始事务: ${options?.targetMethod}`);
try {
const result = await proceed(args);
console.log(`✅ 事务提交: ${options?.targetMethod}`);
return {
...result,
transactionStatus: 'committed',
timestamp: new Date().toISOString()
};
} catch (error) {
console.log(`❌ 事务回滚: ${options?.targetMethod}`, error);
throw error;
}
}
}
@Service()
class UserService {
@Around(TransactionAspect, { timeout: 5000 })
async createUser(userData: any) {
return { id: Date.now(), ...userData };
}
}使用koatty_cli进行创建:
kt aspect test自动生成的模板代码:
import { Aspect } from "koatty";
import { App } from '../App';

@Aspect()
export class TestAspect {
    app: App;

    run() {
        console.log('TestAspect');
    }
}Koatty 框架提供了丰富的装饰器来简化开发。装饰器按照作用范围分为:类装饰器、属性装饰器、方法装饰器和参数装饰器。
| 装饰器名称 | 参数 | 说明 | 备注 |
|---|---|---|---|
@Bootstrap() |
bootFunc?: (...args: any[]) => any 应用启动前执行函数 |
声明当前类是一个启动类,为项目的入口文件。启动类必须继承 Koatty |
仅用于应用启动类 |
@ComponentScan() |
scanPath?: string | string[] 扫描目录 |
定义项目需要自动装载进容器的目录,默认扫描 src 目录 |
仅用于应用启动类 |
@ConfigurationScan() |
scanPath?: string | string[] 配置文件目录 |
定义项目需要加载的配置文件目录,默认 ./config |
仅用于应用启动类 |
| 装饰器名称 | 参数 | 说明 | 备注 |
|---|---|---|---|
@Component() |
identifier?: string IOC容器标识options?: IComponentOptions 配置项:- enabled?: boolean 是否启用(默认true)- priority?: number 加载优先级(默认0)- scope?: 'core' | 'user' 组件范围- requires?: string[] 依赖组件名称- version?: string 组件版本- description?: string 组件描述 |
定义该类为组件类。可配合 @OnEvent 装饰器绑定生命周期事件 |
第三方模块或扩展类使用 |
@Plugin() |
identifier?: string IOC容器标识(必须以"Plugin"结尾)options?: IPluginOptions 配置项同 @Component |
定义该类是插件类。插件必须实现 run(options, app) 方法 |
仅用于插件类 |
@Service() |
identifier?: string IOC容器标识options?: object 可选配置项 |
定义该类是服务类 | 仅用于服务类 |
@Middleware() |
identifier?: string 自定义标识options?: IMiddlewareOptions 配置项:- protocol?: string | string[] 协议列表- priority?: number 优先级(默认50)- enabled?: boolean 是否启用(默认true) |
定义该类是中间件类。可指定 protocol 限定生效协议 |
仅用于中间件类 |
| 装饰器名称 | 参数 | 说明 | 备注 |
|---|---|---|---|
@Controller() |
path?: string 路由路径(默认"/")options?: IControllerOptions 配置项:- middleware?: Function[] 控制器级别中间件 |
定义 HTTP/HTTPS/HTTP2 控制器类 | 仅用于 HTTP 控制器 |
@GrpcController() |
path?: string 路由路径(必须与 proto 的 service 名称一致)options?: IExtraControllerOptions 配置项:- middleware?: Function[] 控制器级别中间件 |
定义 gRPC 控制器类 | 仅用于 gRPC 控制器 |
@WebSocketController() |
path?: string 路由路径options?: IExtraControllerOptions |
定义 WebSocket 控制器类 | 仅用于 WebSocket 控制器 |
@GraphQLController() |
path?: string 路由路径options?: IControllerOptions |
定义 GraphQL 控制器类 | 仅用于 GraphQL 控制器 |
注意:AOP 还有方法级别的装饰器
@Before、@After、@Around,详见下方"方法装饰器"章节。
| 装饰器名称 | 参数 | 说明 | 备注 |
|---|---|---|---|
@Aspect() |
identifier?: string IOC容器标识 |
声明切面类。类名必须以"Aspect"结尾,必须实现 run 方法 |
仅用于切面类 |
@BeforeEach() |
aopName: ClassOrString 切面类名或类options?: any 可选配置 |
在类的每个方法执行前执行切面(排除 constructor/init/__before/__after) | 类装饰器 |
@AfterEach() |
aopName: ClassOrString 切面类名或类options?: any 可选配置 |
在类的每个方法执行后执行切面 | 类装饰器 |
@AroundEach() |
aopName: ClassOrString 切面类名或类options?: any 可选配置 |
包装类的每个方法执行 | 类装饰器 |
| 装饰器名称 | 参数 | 说明 | 备注 |
|---|---|---|---|
@ExceptionHandler() |
无 | 定义全局异常处理类。类必须继承 Exception 并实现 handler 方法 |
仅用于异常处理类 |
| 装饰器名称 | 参数 | 说明 | 备注 |
|---|---|---|---|
@Autowired() |
paramName?: ClassOrString 依赖类或标识cType?: string 组件类型(默认"COMPONENT")constructArgs?: any[] 构造参数isDelay?: boolean 是否延迟加载(默认false) |
从IOC容器自动注入依赖。不能注入 CONTROLLER 类型 | 属性装饰器 |
@Config() |
key?: string 配置项的keytype?: string 配置类型(默认"config") |
注入配置值。类型对应配置文件名,如 "db" 对应 db.ts | 属性装饰器 |
@Values() |
value: unknown | Function 属性值或返回值的函数defaultValue?: unknown 默认值 |
动态设置属性值。会进行类型检查 | 属性装饰器 |
@Log() |
无 | 注入全局 DefaultLogger 单例。需配合 koatty_container 使用 | 属性装饰器 |
@Log(options) |
options?: LoggerOpt 可选配置(logLevel、logFilePath、sensFields、batchConfig 等) |
注入 new Logger(options) 的实例,按类+属性缓存 |
属性装饰器 |
@IsDefined() / @Expose() |
无 | 标记属性为已定义,用于参数验证时导出属性 | 验证装饰器 |
| 装饰器名称 | 参数 | 说明 | 备注 |
|---|---|---|---|
@OnEvent() |
event: AppEvent 事件类型:- AppEvent.appBoot 应用启动初始化后- AppEvent.loadServe 服务器加载时- AppEvent.loadRouter 路由加载时- AppEvent.appReady 应用准备就绪- AppEvent.appStart 应用启动完成- AppEvent.appStop 应用停止时 |
将方法绑定到应用生命周期事件 | 仅用于 @Component 或 @Plugin 类 |
用于单个方法的切面声明。与类级别的 @BeforeEach/@AfterEach/@AroundEach 不同,这些装饰器只作用于被装饰的方法。
| 装饰器名称 | 参数 | 说明 | 备注 |
|---|---|---|---|
@Before() |
aopName: ClassOrString 切面类名或类options?: any 可选配置 |
在方法执行前执行切面的 run 方法 |
方法装饰器 |
@After() |
aopName: ClassOrString 切面类名或类options?: any 可选配置 |
在方法执行后执行切面的 run 方法 |
方法装饰器 |
@Around() |
aopName: ClassOrString 切面类名或类options?: any 可选配置 |
包装方法执行,切面的 run 方法接收 proceed 函数 |
方法装饰器 |
AOP 装饰器对比:
| 装饰器 | 类型 | 作用范围 | 使用场景 |
|---|---|---|---|
@Before() |
方法装饰器 | 单个方法 | 特定方法执行前的前置处理 |
@After() |
方法装饰器 | 单个方法 | 特定方法执行后的后置处理 |
@Around() |
方法装饰器 | 单个方法 | 包装特定方法,可控制执行流程 |
@BeforeEach() |
类装饰器 | 类的所有方法 | 类内所有方法的统一前置处理 |
@AfterEach() |
类装饰器 | 类的所有方法 | 类内所有方法的统一后置处理 |
@AroundEach() |
类装饰器 | 类的所有方法 | 包装类内所有方法 |
| 装饰器名称 | 参数 | 说明 | 备注 |
|---|---|---|---|
@RequestMapping() |
path?: string 路由路径(默认"/")reqMethod?: RequestMethod 请求方式(默认GET)routerOptions?: object 配置项:- routerName?: string 路由名称- middleware?: Function[] | MiddlewareDecoratorConfig[] 方法级别中间件 |
绑定路由到方法 | 仅用于控制器方法 |
@GetMapping() |
path?: string 路由路径routerOptions?: RouterOption |
绑定 GET 路由 | 仅用于控制器方法 |
@PostMapping() |
path?: string 路由路径routerOptions?: RouterOption |
绑定 POST 路由 | 仅用于控制器方法 |
@PutMapping() |
path?: string 路由路径routerOptions?: RouterOption |
绑定 PUT 路由 | 仅用于控制器方法 |
@DeleteMapping() |
path?: string 路由路径routerOptions?: RouterOption |
绑定 DELETE 路由 | 仅用于控制器方法 |
@PatchMapping() |
path?: string 路由路径routerOptions?: RouterOption |
绑定 PATCH 路由 | 仅用于控制器方法 |
@OptionsMapping() |
path?: string 路由路径routerOptions?: RouterOption |
绑定 OPTIONS 路由 | 仅用于控制器方法 |
@HeadMapping() |
path?: string 路由路径routerOptions?: RouterOption |
绑定 HEAD 路由 | 仅用于控制器方法 |
| 装饰器名称 | 参数 | 说明 | 备注 |
|---|---|---|---|
@Validated() |
isAsync?: boolean 是否异步模式(默认true) |
自动验证方法参数中的 DTO 对象 | 仅用于控制器方法 |
| 装饰器名称 | 参数 | 说明 | 备注 |
|---|---|---|---|
@Catch() |
无参数 | 捕获所有错误并转换为 Exception | 方法装饰器 |
@Catch() |
exception: ExceptionConstructor 自定义异常类 |
使用指定的 Exception 类处理错误 | 方法装饰器 |
@Catch() |
code: number, message?: string 错误码和消息 |
指定错误码和消息 | 方法装饰器 |
@Catch() |
options: CatchOptions 完整配置 |
完整配置模式,支持 code/status/message/exception/catchTypes/transform/preserveStack/suppress | 方法装饰器 |
@Catch() |
errorTypes: ErrorType[], options?: CatchOptions |
只捕获特定类型的错误 | 方法装饰器 |
| 装饰器名称 | 参数 | 说明 | 备注 |
|---|---|---|---|
@CacheAble() |
cacheName: string 缓存名称options?: CacheAbleOpt 配置项:- params?: string[] 用作缓存键的参数名- timeout?: number 过期时间(秒,默认300) |
自动缓存方法返回值 | 仅用于 SERVICE/COMPONENT 类 |
@CacheEvict() |
cacheName: string 缓存名称options?: CacheEvictOpt 配置项:- params?: string[] 用于定位缓存的参数名- delayedDoubleDeletion?: boolean 启用延迟双删(默认true)- delayTime?: number 延迟时间(ms,默认5000) |
清除方法相关的缓存 | 仅用于 SERVICE/COMPONENT 类 |
| 装饰器名称 | 参数 | 说明 | 备注 |
|---|---|---|---|
@Scheduled() |
cron: string Cron 表达式(支持5位或6位)timezone?: string 时区(默认'Asia/Beijing') |
定义定时执行的方法 | 仅用于 SERVICE/COMPONENT 类 |
@RedLock() |
lockName?: string 锁名称(不提供则自动生成)options?: RedLockMethodOptions 配置项:- lockTimeOut?: number 锁超时(ms)- maxRetries?: number 最大重试次数- retryDelayMs?: number 重试延迟(ms) |
方法执行前获取分布式锁 | 仅用于 SERVICE/COMPONENT 类 |
| 装饰器名称 | 参数 | 说明 | 备注 |
|---|---|---|---|
@Header() |
name?: string 参数名defaultValue?: any 默认值 |
获取请求头。不传 name 则获取所有请求头 | 仅用于控制器方法参数 |
@PathVariable() |
name?: string 参数名defaultValue?: any 默认值 |
获取路由参数(ctx.params) | 仅用于控制器方法参数 |
@Get() |
name?: string 参数名defaultValue?: any 默认值 |
获取 querystring 参数(ctx.query) | 仅用于控制器方法参数 |
@Post() |
name?: string 参数名defaultValue?: any 默认值 |
获取 POST 请求体参数 | 仅用于控制器方法参数 |
@File() |
name?: string 文件名defaultValue?: any 默认值 |
获取上传的文件对象 | 仅用于控制器方法参数 |
@RequestBody() / @Body() |
无 | 获取完整的请求体(包含 body 和 file) | 仅用于控制器方法参数 |
@RequestParam() / @Param() |
无 | 获取 query 和 path 参数的合并对象 | 仅用于控制器方法参数 |
| 装饰器名称 | 参数 | 说明 | 备注 |
|---|---|---|---|
@Valid() |
rule: ValidRules | Function 验证规则或自定义函数options?: string | ValidOtpions 错误信息或配置 |
验证单个参数 | 仅用于控制器方法参数 |
| 装饰器名称 | 参数 | 说明 | 备注 |
|---|---|---|---|
@Inject() |
paramName?: ClassOrString 依赖类或标识cType?: string 组件类型(默认"COMPONENT") |
通过构造函数参数注入依赖 | 仅用于构造方法参数 |
@Autowired() |
paramName?: ClassOrString 依赖类或标识cType?: string 组件类型(默认"COMPONENT")constructArgs?: any[] 构造参数isDelay?: boolean 是否延迟加载(默认false) |
从IOC容器自动注入依赖。不能注入 CONTROLLER 类型 |
用于 DTO 类属性验证的装饰器(配合 @Validated() 使用):
| 装饰器名称 | 说明 |
|---|---|
@IsCnName() |
验证中文姓名 |
@IsIdNumber() |
验证身份证号 |
@IsMobile() |
验证手机号 |
@IsZipCode() |
验证邮政编码 |
@IsPlateNumber() |
验证车牌号 |
| 装饰器名称 | 参数 | 说明 |
|---|---|---|
@IsNotEmpty() |
options?: ValidationOptions |
验证非空 |
@IsEmail() |
options?: IsEmailOptions, validationOptions?: ValidationOptions |
验证邮箱 |
@IsIP() |
version?: any, validationOptions?: ValidationOptions |
验证 IP 地址 |
@IsPhoneNumber() |
region?: CountryCode, validationOptions?: ValidationOptions |
验证国际电话号码 |
@IsUrl() |
options?: IsURLOptions, validationOptions?: ValidationOptions |
验证 URL |
@IsHash() |
algorithm: HashAlgorithm, validationOptions?: ValidationOptions |
验证哈希值 |
@IsDate() |
options?: ValidationOptions |
验证日期 |
| 装饰器名称 | 参数 | 说明 |
|---|---|---|
@Gt() |
min: number |
大于 |
@Gte() |
min: number |
大于等于 |
@Lt() |
max: number |
小于 |
@Lte() |
max: number |
小于等于 |
@Equals() |
comparison: any |
等于 |
@NotEquals() |
comparison: any |
不等于 |
| 装饰器名称 | 参数 | 说明 |
|---|---|---|
@Contains() |
seed: string |
包含字符串 |
@IsIn() |
possibleValues: any[] |
在数组中 |
@IsNotIn() |
possibleValues: any[] |
不在数组中 |
用于创建高级中间件配置,支持优先级、条件执行、元数据等特性:
import { withMiddleware, GetMapping } from "koatty";

@Controller('/api')
export class UserController {

  @GetMapping('/users', {
    middleware: [
      withMiddleware(AuthMiddleware, {
        priority: 100,           // 优先级,数值越高越先执行
        enabled: true,           // 是否启用
        conditions: [            // 条件执行
          { type: 'header', value: 'authorization', operator: 'contains' }
        ],
        metadata: { role: 'admin' }  // 传递给中间件的元数据
      }),
      withMiddleware(RateLimitMiddleware, {
        priority: 90,
        metadata: { limit: 100, window: 60000 }
      })
    ]
  })
  async getUsers() {
    return 'users list';
  }
}Koatty 4.0 提供了强大的自定义装饰器功能,支持方法、属性、类等多种装饰器。
import { decoratorManager } from 'koatty_container';

// 1️⃣ 定义装饰器逻辑
const timingWrapper = (originalMethod: Function, config: any, methodName: string) => {
  return function (this: any, ...args: any[]) {
    const start = Date.now();
    console.log(`⏱️ 开始执行 ${methodName}`);

    const result = originalMethod.apply(this, args);

    const duration = Date.now() - start;
    console.log(`✅ ${methodName} 执行完成,耗时 ${duration}ms`);

    return result;
  };
};

// 2️⃣ 注册装饰器
decoratorManager.method.registerWrapper('timing', timingWrapper);

// 3️⃣ 创建装饰器函数
function Timing(enabled: boolean = true) {
  return function (target: any, propertyKey: string, descriptor: PropertyDescriptor) {
    return decoratorManager.method.registerDecorator(target, propertyKey, {
      type: 'timing',
      config: { enabled },
      applied: false,
      priority: 5 // 优先级控制
    }, descriptor);
  };
}

// 4️⃣ 使用自定义装饰器
class UserService {
  @Timing()
  async createUser(userData: any) {
    // 模拟数据库操作
    await new Promise(resolve => setTimeout(resolve, 100));
    return { id: Date.now(), ...userData };
  }

  @Timing(false) // 禁用计时
  async getUser(id: string) {
    return { id, name: "John Doe" };
  }
}// 高级缓存装饰器示例
const cacheWrapper = (originalMethod: Function, config: any, methodName: string) => {
const cache = new Map();
return function (this: any, ...args: any[]) {
const cacheKey = config.keyGenerator ?
config.keyGenerator(args) :
JSON.stringify(args);
// 检查缓存
if (cache.has(cacheKey)) {
console.log(`🎯 缓存命中: ${methodName}`);
return cache.get(cacheKey);
}
// 执行原方法
const result = originalMethod.apply(this, args);
// 处理异步结果
if (result instanceof Promise) {
return result.then(asyncResult => {
cache.set(cacheKey, asyncResult);
console.log(`💾 缓存存储: ${methodName}`);
// TTL 支持
if (config.ttl) {
setTimeout(() => cache.delete(cacheKey), config.ttl * 1000);
}
return asyncResult;
});
}
// 缓存同步结果
cache.set(cacheKey, result);
return result;
};
};
decoratorManager.method.registerWrapper('cache', cacheWrapper);
function Cache(ttl?: number, keyGenerator?: (args: any[]) => string) {
return function (target: any, propertyKey: string, descriptor: PropertyDescriptor) {
return decoratorManager.method.registerDecorator(target, propertyKey, {
type: 'cache',
config: { ttl, keyGenerator },
applied: false,
priority: 10 // 高优先级,优先执行
}, descriptor);
};
}
// 使用缓存装饰器
class DataService {
@Cache(300, (args) => `user:${args[0]}`) // 5分钟 TTL,自定义键
async getUserProfile(userId: string) {
console.log(`📡 从数据库加载用户: ${userId}`);
// 模拟数据库查询
await new Promise(resolve => setTimeout(resolve, 200));
return { id: userId, name: "John", email: "john@example.com" };
}
}// 属性验证装饰器
const validateWrapper = (originalDescriptor: PropertyDescriptor | undefined, config: any, propertyName: string) => {
return {
get: function () {
const privateKey = `_${propertyName}`;
if (!(privateKey in this)) {
// 设置默认值
(this as any)[privateKey] = config.defaultValue;
}
return (this as any)[privateKey];
},
set: function (value: any) {
// 类型验证
if (config.type && typeof value !== config.type) {
throw new Error(`属性 ${propertyName} 必须为 ${config.type} 类型`);
}
// 自定义验证器
if (config.validators) {
for (const validator of config.validators) {
if (!validator.fn(value)) {
throw new Error(`属性 ${propertyName} 验证失败: ${validator.message}`);
}
}
}
console.log(`✅ 属性 ${propertyName} 设置为:`, value);
(this as any)[`_${propertyName}`] = value;
},
enumerable: true,
configurable: true
};
};
decoratorManager.property.registerWrapper('validate', validateWrapper);
function Validate(
type?: string,
validators?: Array<{ fn: (value: any) => boolean; message: string }>,
defaultValue?: any
) {
return function (target: any, propertyKey: string) {
return decoratorManager.property.registerDecorator(target, propertyKey, {
wrapperTypes: ['validate'],
config: { type, validators, defaultValue }
});
};
}
// 使用属性装饰器
class User {
@Validate('string', [
{ fn: (v: string) => v.length > 0, message: '姓名不能为空' },
{ fn: (v: string) => v.length < 50, message: '姓名长度必须小于 50' }
], '匿名')
name: string;
@Validate('string', [
{ fn: (v) => /^[\w-\.]+@([\w-]+\.)+[\w-]{2,4}$/.test(v), message: '邮箱格式不正确' }
])
email: string;
@Validate('number', [
{ fn: (v: number) => v >= 18, message: '年龄必须至少 18 岁' }
], 18)
age: number;
}
// 使用示例
const user = new User();
console.log(user.name); // "匿名" (默认值)
user.age = 25; // ✅ 验证通过
// user.age = 15; // ❌ 抛出错误:年龄必须至少 18 岁// 依赖注入装饰器
const injectWrapper = (originalClass: Function, config: any) => {
return class extends (originalClass as any) {
constructor(...args: any[]) {
super(...args);
// 自动注入依赖
for (const [key, dependency] of Object.entries(config.dependencies)) {
(this as any)[key] = dependency;
}
console.log(`🔌 为 ${originalClass.name} 注入依赖:`, Object.keys(config.dependencies));
}
};
};
decoratorManager.class.registerWrapper('inject', injectWrapper);
function Injectable(dependencies: Record<string, any>) {
return function (target: Function) {
return decoratorManager.class.registerDecorator(target, {
type: 'inject',
config: { dependencies },
applied: false,
priority: 1
});
};
}
// 使用类装饰器
@Injectable({
logger: { log: (msg: string) => console.log(`[LOG] ${msg}`) },
config: { apiUrl: 'https://api.example.com', timeout: 5000 }
})
class ApiService {
private logger: any;
private config: any;
async fetchData(endpoint: string) {
this.logger.log(`请求: ${this.config.apiUrl}${endpoint}`);
// API 调用逻辑
return { data: 'success' };
}
}class OrderService {
@Timing() // 优先级: 5
@Cache(600) // 优先级: 10 (先执行)
@RateLimit(100) // 优先级: 15 (最早执行)
async processOrder(orderData: any) {
// 执行顺序: RateLimit -> Cache -> Timing -> 原方法
return { orderId: Date.now(), ...orderData };
}
}function ConditionalCache(condition: () => boolean, ttl: number = 300) {
return function (target: any, propertyKey: string, descriptor: PropertyDescriptor) {
if (!condition()) {
return descriptor; // 条件不满足,不应用装饰器
}
return decoratorManager.method.registerDecorator(target, propertyKey, {
type: 'cache',
config: { ttl },
applied: false,
priority: 8
}, descriptor);
};
}
class ProductService {
@ConditionalCache(() => process.env.NODE_ENV === 'production', 600)
async getProductList() {
// 仅在生产环境启用缓存
return await this.fetchProducts();
}
}// 获取装饰器使用统计
const stats = decoratorManager.getComprehensiveStats();
console.log('📊 装饰器统计:');
console.log(` 方法装饰器: ${stats.method.decoratedMethods}`);
console.log(` 类装饰器: ${stats.class.decoratedClasses}`);
console.log(` 属性装饰器: ${stats.property.decoratedProperties}`);
console.log(` 缓存命中率: ${stats.method.cacheStats.hitRate}%`);
console.log(` 已注册装饰器类型: ${stats.method.registeredTypes.join(', ')}`);
// 性能监控
const performance = decoratorManager.getPerformanceMetrics();
console.log('⚡ 性能指标:');
console.log(` 平均执行时间: ${performance.averageExecutionTime}ms`);
console.log(` 内存使用: ${performance.memoryUsage}MB`);Koatty遵循约定大于配置的原则。为规范项目代码,提高健壮性,做了一些默认的规范和约定。
-
小版本:如:1.1.1 => 1.1.2(小功能增加,bug 修复等,向下兼容1.1.x)
-
中版本:如:1.1.0 => 1.2.0(较大功能增加,部分模块重构等。主体向下兼容,可能存在少量特性不兼容)
-
大版本:如:1.0.0 => 2.0.0(框架整体设计、重构等,不向下兼容)
-
稳定版本: 尾数字为偶数的版本为稳定版本,奇数的为非稳定版本
-
以Class范式编程
包括Controller、Service、Model等类型的类,使用
Class而非function来组织代码。配置、工具、函数库、第三方库除外。 -
单个文件仅export一个类
在项目中,单个.ts文件仅export一次且导出的是Class。配置、工具、函数库、第三方库除外。
- 类名必须与文件名相同
熟悉JAVA的人对此一定不会陌生。类名同文件名必须相同,使得在IOC容器内保持唯一性,防止类被覆盖。
- 同类型不允许存在同名类
Koatty将IOC容器内的Bean分为 'COMPONENT' | 'CONTROLLER' | 'MIDDLEWARE' | 'SERVICE' 四种类型。
相同类型的Bean不允许有同名的类,否则会导致装载失败。
例如:src/Controller/IndexController.ts 和 src/Controller/Test/IndexController.ts就是同名类。
需要注意的是,Bean的类型是由装饰器决定的而非文件名或目录名。给IndexController.ts加 @Service()装饰器的话那么它的类型就是SERVICE。
- 对于Koatty官方出品的组件,我们建议通过 ^ 的方式引入依赖,并且强烈不建议锁定版本。
{
  "dependencies": {
    "koatty_lib": "^1.0.0"
  }
}Comesoon...