A terminal-based messaging app that can be deployed on a VPS using Docker + NGINX or inside a Kubernetes cluster (e.g., on Raspberry Pi 5).
git clone https://github.com/andreireporter13/terminal-messenger.git
cd terminal-messengerThe project already includes a Dockerfile in the root directory, so you can build and run the app directly without modifying anything.
docker build -t terminal-messenger .
docker run -d -p 8000:8000 terminal-messenger---> https://github.com/andreireporter13/terminal-messenger/blob/main/nginx/nginx.conf
Watch terminal-messenger live in action:
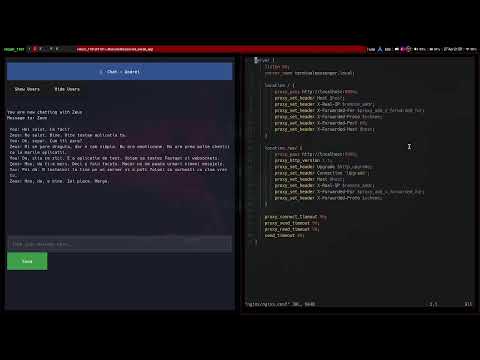
Demo by return_1101
You can deploy terminal-messenger to a Kubernetes cluster — including on a Raspberry Pi 5 — using the manifests provided in this repository.
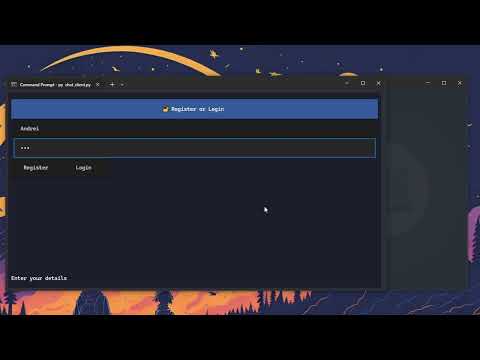
The chat_client.py script is designed to run outside of the Docker container. It is a separate terminal-based client application that connects to the backend API and WebSocket server.
You should run it locally on your machine, after installing the required Python packages and setting the correct server address (as described above).
This allows the client to communicate with a backend deployed via Docker, VPS, or Kubernetes.
python3 -m venv venv
source venv/bin/activatepip install -r requirements.txtOpen the chat_client.py file and replace the default URLs with the actual IP and port of your server:
API_URL = "http://your-server-ip:8000"
WS_URL = "ws://your-server-ip:8000"
Make sure to use ws:// or wss:// for the WS_URL depending on whether you're using HTTPS.
git clone https://github.com/andreireporter13/terminal-messenger.git
cd terminal-messenger
2. If you are setting up a new environment, make sure to install Docker again and rebuild the application container before running it."
docker build -t terminal-messenger .
docker run -d -p 8000:8000 terminal-messenger
3. You need a Docker image hosted on a container registry or accessible from your server to deploy the application.
# Save docker image locally
sudo docker save terminal-messenger:latest -o terminal-messenger.tar
sudo ctr -n k8s.io image import terminal-messenger.tar
#
# search it
sudo ctr -n k8s.io images ls | grep terminal-messenger

# import image direct in k3s
sudo ctr --address /run/k3s/containerd/containerd.sock -n k8s.io images import terminal-messenger.tar
4. You need to create a Kubernetes Deployment manifest file (e.g., deployment.yaml) with the following content to deploy the application:
# Deployment
apiVersion: apps/v1                # API version for Deployment resource
kind: Deployment                  # Defines a Deployment to manage Pods
metadata:
  name: terminal-messenger        # Name of the Deployment
  namespace: learning-dev         # Namespace where this Deployment will be created
spec:
  replicas: 1                    # Number of pod replicas to run
  selector:
    matchLabels:
      app: terminal-messenger    # Label selector to identify pods managed by this Deployment
  template:                      # Pod template used by this Deployment
    metadata:
      labels:
        app: terminal-messenger  # Labels assigned to pods created by this Deployment
    spec:
      containers:
      - name: terminal-messenger # Container name inside the pod
        image: docker.io/library/terminal-messenger:latest # Docker image to use (local image expected)
        imagePullPolicy: Never
        ports:
        - containerPort: 8000    # Container port exposed inside the pod
5. After creating the Deployment manifest, you also need to create a Service manifest (e.g., service.yaml) to expose your application inside the Kubernetes cluster. Use the following content:
# Service
apiVersion: v1                      # API version for Service resource
kind: Service                      # Defines a Service to expose the Deployment
metadata:
  name: terminal-messenger          # Name of the Service
  namespace: learning-dev           # Namespace for the Service, same as Deployment
spec:
  selector:
    app: terminal-messenger        # Selects pods with this label to route traffic to
  ports:
  - protocol: TCP                  # Protocol used by the Service port
    port: 8000                    # Port exposed by the Service (inside the cluster)
    targetPort: 8000              # Port on the container to forward traffic to
  type: NodePort                  # Service type exposes port on each node on a random port (30000-32767)
6. Since the application uses WebSockets, you need an Ingress resource configured properly to support them. Here is an example ingress.yaml manifest you can create:
# Ingress
apiVersion: networking.k8s.io/v1
kind: Ingress
metadata:
  name: terminal-messenger-ingress           # Name of the Ingress resource
  namespace: learning-dev                      # Namespace where the Ingress is deployed
  annotations:
    nginx.ingress.kubernetes.io/proxy-read-timeout: "3600"   # Increase read timeout to keep websocket alive
    nginx.ingress.kubernetes.io/proxy-send-timeout: "3600"   # Increase send timeout for the same reason
    nginx.ingress.kubernetes.io/enable-websocket: "true"    # Enable websocket support in NGINX ingress
spec:
  rules:
  - host: terminalmessenger.local              # Hostname to route traffic for this ingress
    http:
      paths:
      - path: /                               # Match all paths starting with '/'
        pathType: Prefix                      # Use prefix matching for paths
        backend:
          service:
            name: terminal-messenger          # Service name to forward traffic to
            port:
number: 8000 # Port exposed by the service to targetTo deploy the application on your Kubernetes cluster, run the following commands to apply the Deployment, Service, and Ingress manifests in the learning-dev namespace:
sudo kubectl apply -n learning-dev -f mess_deployment.yaml
sudo kubectl apply -n learning-dev -f mess_service.yaml
sudo kubectl apply -n learning-dev -f mess_ingress.yaml
P.S. The -n learning-dev flag specifies my Kubernetes namespace; please replace it with your own namespace if different.
P.S. For more details about installation and additional setup instructions, please visit: -> https://github.com/andreireporter13/terminal-messenger/blob/main/k3s_install_raspberry_pi5
Watch terminal-messenger live in action:
Kubernetes Deployment Demo by return_1101