-
Notifications
You must be signed in to change notification settings - Fork 2
Complete examples & documentation #6
New issue
Have a question about this project? Sign up for a free GitHub account to open an issue and contact its maintainers and the community.
By clicking “Sign up for GitHub”, you agree to our terms of service and privacy statement. We’ll occasionally send you account related emails.
Already on GitHub? Sign in to your account
Merged
Merged
Changes from 9 commits
Commits
Show all changes
15 commits
Select commit
Hold shift + click to select a range
a43fa87
Add test suite and mock service for Smartsheet connector
nostoc ad36f61
[Automated] Update the toml files
nostoc 38ca27e
Refactor mock service
nostoc 2cba8b4
Add an example
nostoc a9c5820
Update documentation
nostoc b28bd91
Merge branch 'ballerina-platform:main' into main
nostoc f3b1d7f
Update README.md file of examples directory
nostoc 328ae67
Update example and its' documentaion
nostoc 1fcb249
Update documentation
nostoc 6d5fe59
[Automated] Update the toml files
nostoc d5133bd
Update version and workflows
nostoc c010a2b
[Automated] Update the toml files
nostoc f0fd98b
Add keywords
nostoc b36261a
Update regenrate-connector.yaml
nostoc db399e1
Update version in the example
nostoc File filter
Filter by extension
Conversations
Failed to load comments.
Loading
Jump to
Jump to file
Failed to load files.
Loading
Diff view
Diff view
There are no files selected for viewing
This file contains hidden or bidirectional Unicode text that may be interpreted or compiled differently than what appears below. To review, open the file in an editor that reveals hidden Unicode characters.
Learn more about bidirectional Unicode characters
| Original file line number | Diff line number | Diff line change |
|---|---|---|
|
|
@@ -56,3 +56,5 @@ build | |
|
|
||
| # Ignore Docker env file | ||
| docker.env | ||
|
|
||
| examples/**/Dependencies.toml | ||
This file contains hidden or bidirectional Unicode text that may be interpreted or compiled differently than what appears below. To review, open the file in an editor that reveals hidden Unicode characters.
Learn more about bidirectional Unicode characters
This file contains hidden or bidirectional Unicode text that may be interpreted or compiled differently than what appears below. To review, open the file in an editor that reveals hidden Unicode characters.
Learn more about bidirectional Unicode characters
This file contains hidden or bidirectional Unicode text that may be interpreted or compiled differently than what appears below. To review, open the file in an editor that reveals hidden Unicode characters.
Learn more about bidirectional Unicode characters
| Original file line number | Diff line number | Diff line change |
|---|---|---|
| @@ -1,17 +1,108 @@ | ||
| ## Overview | ||
|
|
||
| [//]: # (TODO: Add overview mentioning the purpose of the module, supported REST API versions, and other high-level details.) | ||
| [Smartsheet](https://www.smartsheet.com/) is a cloud-based platform that enables teams to plan, capture, manage, automate, and report on work at scale, empowering you to move from idea to impact, fast. | ||
|
|
||
| The `ballerinax/smartsheet` package offers APIs to connect and interact with [Smartsheet API](https://developers.smartsheet.com/api/smartsheet/introduction) endpoints, specifically based on [Smartsheet API v2.0](https://developers.smartsheet.com/api/smartsheet/openapi). | ||
|
|
||
|
|
||
| ## Setup guide | ||
|
|
||
| [//]: # (TODO: Add detailed steps to obtain credentials and configure the module.) | ||
| To use the Smartsheet connector, you must have access to the Smartsheet API through a [Smartsheet developer account](https://developers.smartsheet.com/) and obtain an API access token. If you do not have a Smartsheet account, you can sign up for one [here](https://www.smartsheet.com/try-it). | ||
|
|
||
| ### Step 1: Create a Smartsheet Account | ||
|
|
||
| 1. Navigate to the [Smartsheet website](https://www.smartsheet.com/) and sign up for an account or log in if you already have one. | ||
|
|
||
| 2. Ensure you have a Business or Enterprise plan, as the Smartsheet API is restricted to users on these plans. | ||
|
|
||
| ### Step 2: Generate an API Access Token | ||
|
|
||
| 1. Log in to your Smartsheet account. | ||
|
|
||
| 2. On the left Navigation Bar at the bottom, select Account (your profile image), then Personal Settings. | ||
|
|
||
| 3. In the new window, navigate to the API Access tab and select Generate new access token. | ||
|
|
||
| 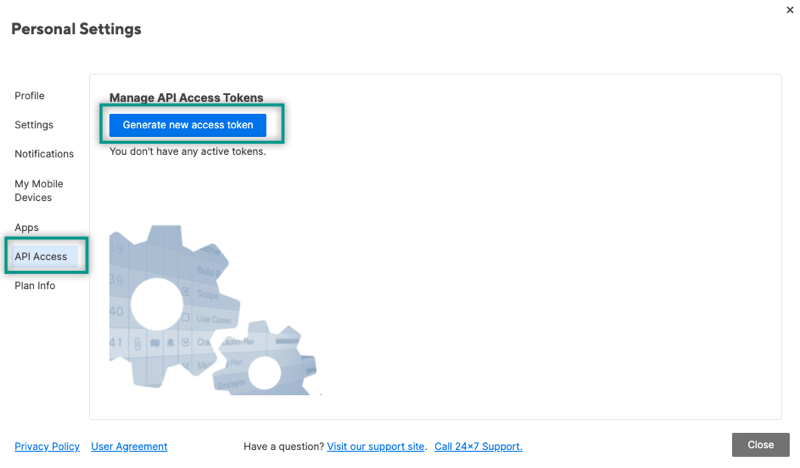 | ||
|
|
||
|
|
||
| > You must copy and store this key somewhere safe. It won't be visible again in your account settings for security reasons | ||
|
|
||
| ## Quickstart | ||
|
|
||
| [//]: # (TODO: Add a quickstart guide to demonstrate a basic functionality of the module, including sample code snippets.) | ||
| To use the `Smartsheet` connector in your Ballerina application, update the `.bal` file as follows: | ||
|
|
||
| ### Step 1: Import the module | ||
|
|
||
| Import the `smartsheet` module. | ||
|
|
||
| ```ballerina | ||
| import ballerinax/smartsheet; | ||
| ``` | ||
|
|
||
| ### Step 2: Instantiate a new connector | ||
|
|
||
| 1. Create a `Config.toml` file and configure the obtained access token as follows: | ||
|
|
||
| ```toml | ||
| token = "<Your_Smartsheet_Access_Token>" | ||
| ``` | ||
|
|
||
| 2. Create a `smartsheet:ConnectionConfig` with the obtained access token and initialize the connector with it. | ||
|
|
||
| ```ballerina | ||
| configurable string token = ?; | ||
|
|
||
| final smartsheet:Client smartsheet = check new({ | ||
| auth: { | ||
| token | ||
| } | ||
| }); | ||
| ``` | ||
|
|
||
| ### Step 3: Invoke the connector operation | ||
|
|
||
| Now, utilize the available connector operations. | ||
|
|
||
| #### Create a new sheet | ||
|
|
||
|
|
||
| ```ballerina | ||
| public function main() returns error? { | ||
| smartsheet:SheetsBody newSheet = { | ||
| name: "New Project Sheet", | ||
| columns: [ | ||
| { | ||
| title: "Task Name", | ||
| type: "TEXT_NUMBER", | ||
| primary: true | ||
| }, | ||
| { | ||
| title: "Status", | ||
| type: "PICKLIST", | ||
| options: ["Not Started", "In Progress", "Complete"] | ||
| }, | ||
| { | ||
| title: "Due Date", | ||
| type: "DATE" | ||
| } | ||
| ] | ||
| }; | ||
|
|
||
| smartsheet:WebhookResponse response = check smartsheet->/sheets.post(newSheet); | ||
| } | ||
| ``` | ||
|
|
||
| ### Step 4: Run the Ballerina application | ||
|
|
||
| ```bash | ||
| bal run | ||
| ``` | ||
|
|
||
|
|
||
| ## Examples | ||
|
|
||
| The `Smartsheet` connector provides practical examples illustrating usage in various scenarios. Explore these [examples](https://github.com/module-ballerinax-smartsheet/tree/main/examples/), covering the following use cases: | ||
|
|
||
| [//]: # (TODO: Add examples) | ||
| 1. [Project task management](https://github.com/module-ballerinax-smartsheet/tree/main/examples/project_task_management) - Demonstrates how to automate project task creation using Ballerina connector for Smartsheet. | ||
|
|
Loading
Sorry, something went wrong. Reload?
Sorry, we cannot display this file.
Sorry, this file is invalid so it cannot be displayed.
This file contains hidden or bidirectional Unicode text that may be interpreted or compiled differently than what appears below. To review, open the file in an editor that reveals hidden Unicode characters.
Learn more about bidirectional Unicode characters
This file contains hidden or bidirectional Unicode text that may be interpreted or compiled differently than what appears below. To review, open the file in an editor that reveals hidden Unicode characters.
Learn more about bidirectional Unicode characters
| Original file line number | Diff line number | Diff line change |
|---|---|---|
| @@ -0,0 +1 @@ | ||
| ../Project Task Management Integration.md |
This file contains hidden or bidirectional Unicode text that may be interpreted or compiled differently than what appears below. To review, open the file in an editor that reveals hidden Unicode characters.
Learn more about bidirectional Unicode characters
| Original file line number | Diff line number | Diff line change |
|---|---|---|
| @@ -0,0 +1,12 @@ | ||
| [package] | ||
| org = "wso2" | ||
| name = "project_task_management" | ||
| version = "0.1.0" | ||
|
|
||
| [[dependency]] | ||
| org = "ballerinax" | ||
| name = "smartsheet" | ||
| version = "0.1.0" | ||
| repository = "local" | ||
|
|
||
|
|
49 changes: 49 additions & 0 deletions
49
examples/project_task_management/Project Task Management Integration.md
This file contains hidden or bidirectional Unicode text that may be interpreted or compiled differently than what appears below. To review, open the file in an editor that reveals hidden Unicode characters.
Learn more about bidirectional Unicode characters
| Original file line number | Diff line number | Diff line change |
|---|---|---|
| @@ -0,0 +1,49 @@ | ||
| # Project Task Management Integration | ||
|
|
||
| This example demonstrates how to automate project task creation using Ballerina connector for Smartsheet. When a new project is created, the system automatically creates initial tasks in Smartsheet and sends a summary notification message to Slack. | ||
|
|
||
| ## Prerequisites | ||
|
|
||
| 1. **Smartsheet Setup** | ||
| - Create a Smartsheet account (Business/Enterprise plan required) | ||
| - Generate an API access token | ||
| - Create two sheets: | ||
| - "Projects" sheet with columns: Project Name, Start Date, Status | ||
| - "Tasks" sheet with columns: Task Name, Assigned To, Due Date, Project Name | ||
|
|
||
| > Refer the [Smartsheet setup guide](https://github.com/ballerina-platform/module-ballerinax-smartsheet/blob/main/ballerina/README.md) here. | ||
|
|
||
| 2. **Slack Setup** | ||
| - Refer the [Slack setup guide](https://github.com/ballerina-platform/module-ballerinax-slack/blob/master/ballerina/README.md) here. | ||
|
|
||
| 3. For this example, create a `Config.toml` file with your credentials. Here's an example of how your `Config.toml` file should look: | ||
|
|
||
| ```toml | ||
| smartsheetToken = "SMARTSHEET_ACCESS_TOKEN" | ||
| projectsSheetName = "PROJECT_SHEET_NAME" | ||
| tasksSheetName = "TASK_SHEET_NAME" | ||
| slackToken = "SLACK_TOKEN" | ||
| slackChannel = "SLACK_CHANNEL" | ||
| ``` | ||
|
|
||
| ## Run the Example | ||
|
|
||
| 1. Execute the following command to run the example: | ||
|
|
||
| ```bash | ||
| bal run | ||
| ``` | ||
|
|
||
| 2. The service will start on port 8080. You can test the integration by sending a POST request to create a new project: | ||
|
|
||
| ```bash | ||
| curl -X POST http://localhost:8080/projects \ | ||
| -H "Content-Type: application/json" \ | ||
| -d '{ | ||
| "projectName": "Website Redesign", | ||
| "startDate": "2025-08-25", | ||
| "status" : "ACTIVE", | ||
| "assignedTo": "developer@example.com" | ||
| }' | ||
| ``` | ||
|
|
Oops, something went wrong.
Oops, something went wrong.
Add this suggestion to a batch that can be applied as a single commit.
This suggestion is invalid because no changes were made to the code.
Suggestions cannot be applied while the pull request is closed.
Suggestions cannot be applied while viewing a subset of changes.
Only one suggestion per line can be applied in a batch.
Add this suggestion to a batch that can be applied as a single commit.
Applying suggestions on deleted lines is not supported.
You must change the existing code in this line in order to create a valid suggestion.
Outdated suggestions cannot be applied.
This suggestion has been applied or marked resolved.
Suggestions cannot be applied from pending reviews.
Suggestions cannot be applied on multi-line comments.
Suggestions cannot be applied while the pull request is queued to merge.
Suggestion cannot be applied right now. Please check back later.
Uh oh!
There was an error while loading. Please reload this page.